
Windows 10 and Super fast logon times
I've been working at really cutting down the initial logon times - started last year, and again with me rolling out Windows 10 2004 I've had to struggle to remember what I actually did, one of the main reasons for my blog is helping out future Katy as she is very forgetful :)
This has always been something that has bugged me, as I remember in 2003 at university there was a Windows 2000/XP network with some sort of NetWare back end. The Windows 2000 PCs (libraries etc mostly) logged on in about 2 minutes, nice and speedy, but in the computing labs they ran XP and it was a 13 minute logon (literally 13 minutes as I timed it). Subsequent logons were also 13 minutes. Extremely frustrating, yet means I've always been dismissive of people complaining of a 90 second logon time.
The first change we made, a few years back now, was to replace all hard drives with SSDs. They don't have to be massive, we were replacing 500GB/1TB HDDs with 128GB SSDs. This improved stock from 2008 from "barely useable" to "actually not that bad really".
We have pushed all user documents to OneDrive. Most people use the sync client to access their files through explorer. At the time there was no per-machine installer for OneDrive and it would take 6 minutes for an initial logon to a PC to be useable - i.e. desktop appears and OneDrive files are available. The worst part of this was that OneDrive took up 3 minutes of the logon time, with the desktop visible so it appears to the user that it's ready to go - then BOOM explorer is killed and re-launched (to add the OneDrive shell extensions). Once the per-machine installer came out I've switched over to that and it's cut that 3 minute wait down to 20 seconds. So we now have a 3 minute 20 second logon time. That was step 1.
It's worth experimenting with your printer deployment - I've found adding printers via Group Policy Preferences can sometime take AGES! I've switched to using PowerShell to do this, so the printers are added in the background after the desktop has appeared.
Remove Unwanted Apps
If you disable the "Show first sign-in animation" in group policy (Computer Configuration\Policies\Administrative Templates\System\Logon) you will speed things up a bit more. Another real boost to the logon speed is removing unneeded AppX packages, as these are all set up when you first log on. As part of my build process a PowerShell script is run which removes all but a select few packages:
$appsToRemove = @(
    "*Zune*"
    "*Xbox*"
    "*WindowsFeedback*"
    "*Wallet*"
    "*SkypeApp*"
    "*People*"
    "*OneConnect*"
    "*Office*"
    "*Messaging*"
    "*Weather*"
    "*windowscommunicationsapps*"
    "*Solitaire*"
    "*WindowsMaps*"
    "*WindowsCamera*"
    "*WindowsAlarms*"
    "*Print3D*"
    "*3DViewer*"
    "*GetStarted*"
    "*GetHelp*"
)
foreach ($app in $appsToRemove) {
    Get-AppxProvisionedPackage -Online | where {$_.PackageName -like $app} | Remove-AppxProvisionedPackage -Online -ErrorAction SilentlyContinue
}
I use Config Mgr for deploying computers - this is one of the later steps in the task sequence.
An alternative method to removing unwanted AppX packages is to use WIM Witch, give it the install.wim and ask it to remove selected AppX packages. This way you will get a list you can select from, and then use the completed wim file in your deployment.
Export Start Layout
Another step which takes a while is generating the start menu tiles database. If you specify an XML file this step gets skipped. Customise the layout how you like it, then run:
Export-StartLayout -Path c:\startlayout.xml
If you are using an Enterprise (or Education) SKU of Windows 10 then this can be copied somewhere such as the NETLOGON share, and configured with group policy to apply to users - User Configuration\Policies\Administrative Templates\Start Menu and Taskbar and set the Start layout setting. If you're not using an edition which supports this, you can still use the XML file, it just needs to be set in the default profile by running Import-StartLayout. We look at customising the default profile next.
Configure Default User profile
Doing all the above has cut the login times down to 1 minute 30 seconds (from about 2 minute 30). Not the best, but still a definite improvement. The final step is to configure the default user profile. There are two ways to do this - on a reference PC, and then capture an image for deployment (not really a recommended way of deploying things any more - much neater to just use the ISO and make any customisations elsewhere), or have a common network Default User profile. The only drawback with the network wide profile is that it'd apply to both Windows Server 2016/2019 remote desktop hosts as well as Windows 10 client PCs. As we don't use remote desktop services, I'm not too bothered about this.
It's quite a lengthy process however it means that all the standard "setting things up" steps have already been run. If you just want Win 10 2004 Education's default profile, I've zipped mine that I have already cleaned up. This also has the restricted WinX menu applied.
So how do we go about this? Firstly we'll need to spin up a virtual machine running Windows 10 2004. Don't build this from your usual deployment solution, as it needs to be off the domain. I just use the Windows 10 ISO as the source. Once it has got as far as the Region selection screen, hit Ctrl, Shift and F3 to enter audit mode.
It should log you on with the local administrator account - that's fine. Press Cancel on Sysprep when it appears, and go about any customisations you want to make. I generally don't make any, but if you really want you can install applications to set default settings in them - although I'd recommend just using Group Policy Preference registry items to deploy these settings, much easier. We now need to get sysprep to copy the administrator profile over the top of the default user profile. To do this we need to specify an answer file containing the "copyprofile=true" setting. The file you need can be created using the Windows System Image Manager (part of the Assessment and Deployment Kit) but it's far easier just to use a pre-created file:
<xml version="1.0" encoding="utf-8"?><unattend xmlns="urn:schemas-microsoft-com:unattend">
<settings pass="specialize">
<component name="Microsoft-Windows-Shell-Setup" processorArchitecture="amd64" publicKeyToken="31bf3856ad364e35" language="neutral" versionScope="nonSxS" xmlns:wcm="http://schemas.microsoft.com/WMIConfig/2002/State" xmlns:xsi="http://www.w3.org/2001/XMLSchema-instance">
<CopyProfile>true</CopyProfile>
</component>
</settings>
<cpi:offlineImage cpi:source="wim:D:/sources/install.wim#Windows 10 Enterprise" xmlns:cpi="urn:schemas-microsoft-com:cpi" />
</unattend>
I usually just save this as c:\unattend.xml on the VM. Now you're ready to run sysprep - in an elevated command prompt:
%windir%\system32\sysprep\sysprep.exe /generalize /oobe /shutdown /unattend:c:\unattend.xml
Once sysprep has done its thing, power the VM back on and wait for Windows to load. Go through the language etc screens until you're logged on as administrator again.
As we're not on the domain, we can't write to NETLOGON, and for some reason I can't get it to let me map a drive ("network path not found" if it's not a domain PC, and "access denied" if I specifically target a DC). Work round for this is to put it on a share somewhere first. In an elevated command prompt, map a drive to your share - this step is required because the Copy Profile UI won't prompt for credentials:
net use q: \\server.fqdn\share
Enter your domain credentials when prompted.
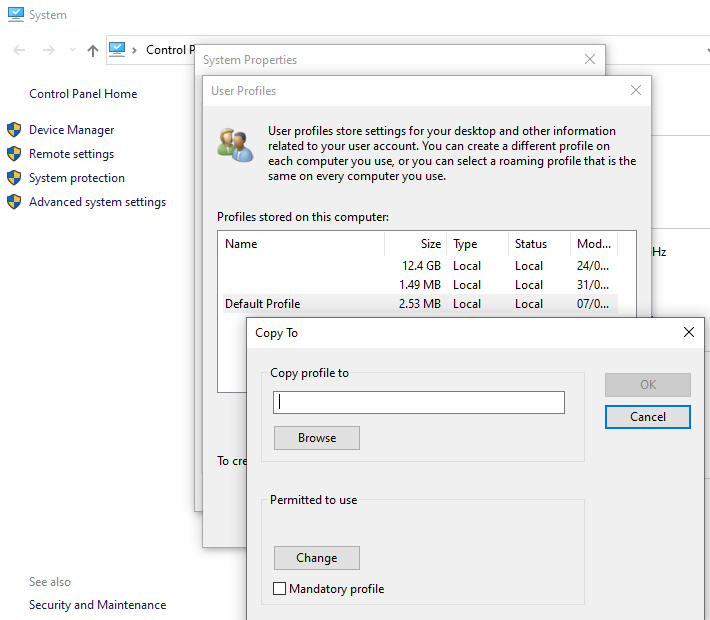
Now go into System Properties (hold down Windows key and hit Pause/Break, otherwise open file explorer, right click on "This PC" and choose "Properties"). Click on "Advanced system settings", then "User Profiles".
Select "Default Profile", then click on "Copy To". You may remember this screen from NT4/2000/XP days, where you could copy any profile - these days you can only copy the default profile, hence all the previous steps. Shame but there must be a reason for it. Enter the path (\\SERVER.fqdn\SHARE\Default User.v6 - or if you're on an older version of Windows 10 you may need to be using .v5), then under "Permitted to use" enter "Everyone".
Now from a domain PC logged on with sufficient access rights, copy the Default User.v6 profile from your share above to \\DOMAIN\NETLOGON.
Now we have the profile happily sitting in NETLOGON there's a few tasks we need to do, mainly to clean up any references to "administrator". In an elevated command prompt:
attrib -s -h "\\domain\netlogon\Default User.v6\ntuser.dat"
copy "\\domain\netlogon\Default User.v6\ntuser.dat" "\\domain\netlogon\Default User.v6\ntuser1.dat"
reg load HKLM\TempHive "\\domain\netlogon\Default User.v6\ntuser1.dat"
regedit
Now you can make any registry changes you see fit, in the HKEY_LOCAL_MACHINE\TempHive key. I tend to add an empty key called #DEFAULTPROFILE# so that when troubleshooting things I can look on a client PC and tell whether a user is using the network default user profile or not.
We also need to remove any reference to "administrator" - at the moment I just do this manually (by running "Find" for anything containing "administrator" on the TempHive key). I then replace any paths such as c:\users\administrator with %USERPROFILE% so they point to the correct location for whoever is logged on. At some point I'll write a script to do this and update this article accordingly. Once you've completed that task, right click on TempHive, and go to Permissions. Take ownership with your own user account (and tick "Replace owner on subcontainers and objects"). Once this has completed, change the permissions so that Everyone has Read access. At this point I also add in an entry giving the technical support staff group Full Control. Again, replace child object permission entries. Last step here is to set the ownership back to Administrators. I'm not sure if this makes a difference or not but rather be safe than sorry.
Back in the elevated command prompt:
reg save HKLM\TempHive "\\domain\netlogon\Default User.v6\ntuser.dat"
reg unload HKLM\TempHive
attrib +s +h "\\domain\netlogon\Default User.v6\ntuser.dat"
Then in explorer, enable showing hidden and system protected files, and delete the following:
ntuser1.dat The .LOG1, .LOG2 and all the .BLF files AppData\LocalLow folder and all contents AppData\Local - everything except the AppData\Local\Microsoft\Windows\WinX folder. AppData\Roaming - everything except the AppData\Roaming\Microsoft\Windows\SendTo and Start Menu folders
I then create an empty folder called #DEFAULTPROFILE#, again so I can tell at a glance if a user is using the correct profile or not. Finally set permissions on the Default User.v6 folder so that Everyone has read access only.

A long, complicated process but once done you should hopefully find your initial logon times have dropped. When I tested this today (on a 4th gen i5, 8GB RAM with SSD) with a pupil logon, the desktop appeared at 17 seconds, and at 41 seconds OneDrive had set itself up and was ready to use. Subsequent logons it was 5 seconds for the desktop and 15 seconds for OneDrive. A massive improvement over the previous 6 minute logon times, and I'm sure much appreciated by all the users on my network.
In this post
Support My Work
I hope you find my content useful. Please consider tipping to support the running costs of hosting, licensing etc on my Ko-fi page.
