
Hybrid Cloud Print
Hybrid Cloud Print is a solution to allow users to print to on-premise printers from their devices without needing to be on site or even have VPN connectivity - they just need Internet access. It is however fairly complicated to set up and requires multiple app registrations in Azure, and an Application Proxy server setting up. In this post I go through the steps on how to set it up and print from an Intune managed device.
Hybrid Cloud Print is being replaced with Universal Print, which is a lot easier to set up and manage - no messing with SQLite and it has a portal in Azure, however it has licensing implications and additional cost. I've also gone through setting up Universal Print.
Before we get started with Hybrid Cloud Print let's have a look at the pre-requisites.
- Azure AD Premium (P1 or P2),
- Intune
- Windows Server 2016 or later Active Directory infrastructure
- Windows Server 2016 or later Print Server
- Windows Server 2016 or later Application Proxy server
- Windows 10 PC for testing
- Public domain name
I'd expect most networks to already have the majority of this, but an Application Proxy Server is a new thing to me so let's look at how we set that up.
Set up the Application Proxy server
Log on to your selected server for the Application Proxy role with administrative credentials. In my case I've created a new Azure VM to host this role. Open regedit.exe and set the following registry settings, then restart the server:
[HKEY_LOCAL_MACHINE\SYSTEM\CurrentControlSet\Control\SecurityProviders\SCHANNEL\Protocols\TLS 1.2]
[HKEY_LOCAL_MACHINE\SYSTEM\CurrentControlSet\Control\SecurityProviders\SCHANNEL\Protocols\TLS 1.2\Client] "DisabledByDefault"=dword:00000000 "Enabled"=dword:00000001
[HKEY_LOCAL_MACHINE\SYSTEM\CurrentControlSet\Control\SecurityProviders\SCHANNEL\Protocols\TLS 1.2\Server] "DisabledByDefault"=dword:00000000 "Enabled"=dword:00000001
[HKEY_LOCAL_MACHINE\SOFTWARE\Microsoft\.NETFramework\v4.0.30319] "SchUseStrongCrypto"=dword:00000001
on 2019 only: [HKEYLOCALMACHINE\SOFTWARE\Microsoft\Windows\CurrentVersion\Internet Settings\WinHttp] "EnableDefaultHttp2"=dword:00000000
Now go to Azure AD > Application Proxy and click on Download connector service.
Back on your server, make sure IE Enhanced Security Configuration is turned off in Server Manager (this step is required for the log in pop up to work). Now run through the installer on your VM, logging in with an account which has application administrator privileges. If you're the only person doing this it's likely to just be your global admin account.
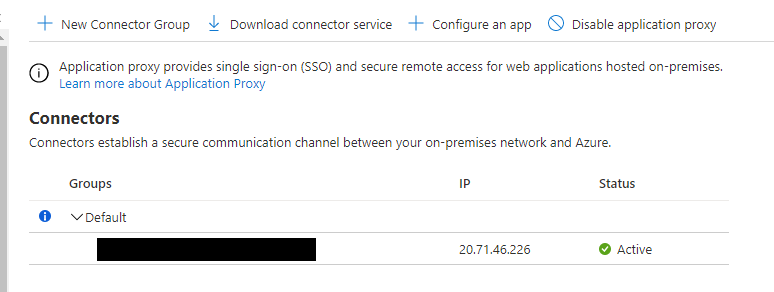
Now refresh the Application Proxy page in Azure and you should see your connector has appeared.
Set up the Application Registration configuration in Azure
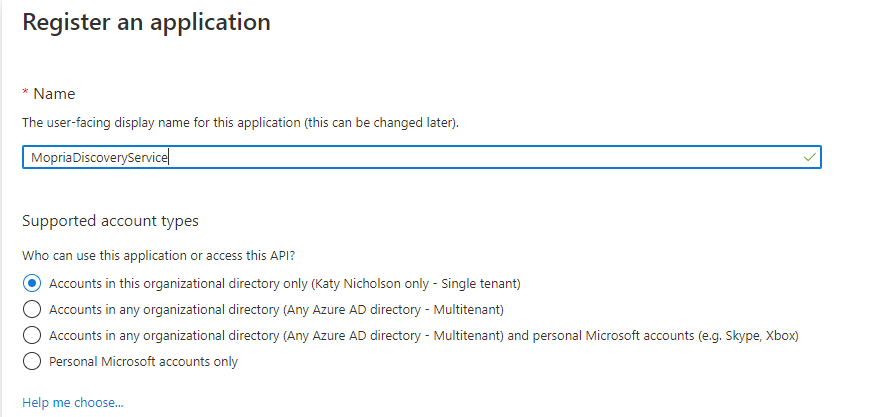
Go to Azure AD > App Registrations and click on New Registration. We're going to create three app registrations here so run through this screen three times:
- MopriaDiscoveryService
- EnterpriseCloudPrint
- NativeAppForHCP
Now in the App Registrations section you should see the three apps - click on MopriaDiscoveryService, Expose an API then Set at the top next to Application ID URI. Leave this at the default and click Save.
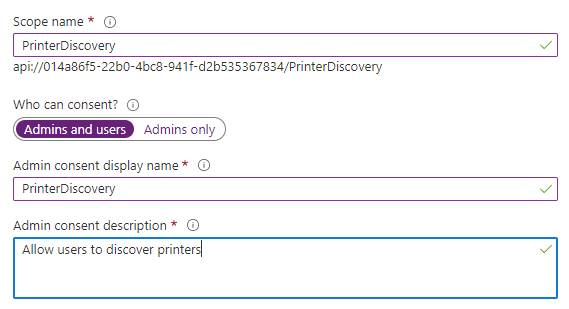
Next click on Expose an API and Add a scope. fill out the details, then click **Add Scope
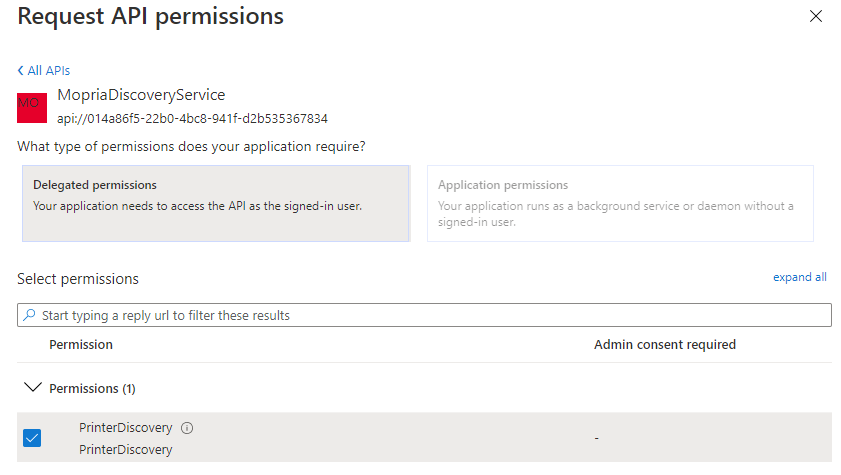
Now go to the NativeAppForHCP and click on API permissions. Click on Add a permission, then APIs my organization uses and type in Mopria, then click on MopriaDiscoveryService that appears. Select Delegated Permissions and tick PrinterDiscovery, then click Add Permissions.
Wait about 10 seconds then refresh the API permissions screen, you should now see a button called Grant admin consent - click on it:

The Status column should now show a green tick for each item.
Now go to Enterprise Applications > All Applications and find the MopriaDiscoveryService and click on it. Now click on Application proxy and enter the internal URL to your print server, e.g. https://print.katystech.blog/mcs/, make sure Pre Authentication is set to Passthrough then click finish.
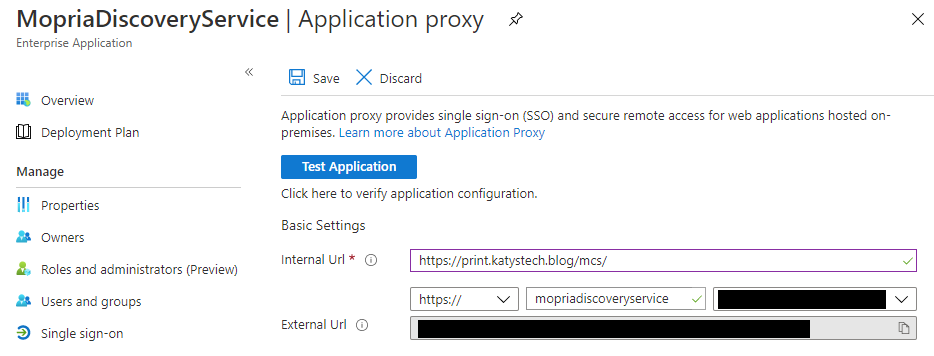
If you selected your own domain rather than themsappproxy.net address you'll need to add a CNAME record and provide an SSL certificate - details of this are at the bottom of the Application Proxy screen.
Repeat these steps for the EnterpriseCloudPrint service, the internal URL for this is in the form of https://print.katystech.blog/ecp/
Now if you go back to App Registrations, click on the MopriaDiscoveryService and then look at Overview you should notice the Application ID URI has changed to the path you just configured in the previous steps.
Now we need to assign users to these applications we have created. Go to Azure AD > Enterprise Applications and click on the MopriaDiscoveryService. There are two options here - if we want to assign the application you can go through Users and Groups, otherwise click on Properties and change User assignment required to No so that all users can use the application. Repeat these steps for the EnterpriseCloudPrint application.
Go to App Registrations and click on the NativeAppForHCP entry. Copy the Application (client) ID from the Overview page. Now go to Authentication and click on Add a platform. Click on Mobile and desktop applications and paste in the following Custom redirect URI:
ms-appx-web://Microsoft.AAD.BrokerPlugin/S-1-15-2-3784861210-599250757-1266852909-3189164077-45880155-1246692841-283550366
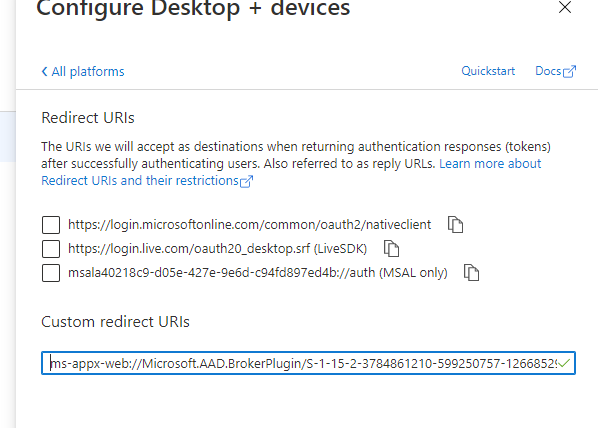
Now click on Add URI and add the following URI:
ms-appx-web://Microsoft.AAD.BrokerPlugin/<ClientID> where ClientID is the Application (Client) ID that you copied earlier.
Configure the Print Server
On your print server make sure you have IIS installed as well as the Print Server role. This is done as usual through Server Manager, Windows Admin Centre or through PowerShell. Once this is done, open an elevated PowerShell window and run Install-Module PublishCloudPrinter. If you get an error "Unable to resolve package source" you may need to force it to use TLS1.2 by running this command first: [Net.ServicePointManager]::SecurityProtocol = [Net.SecurityProtocolType]::Tls12
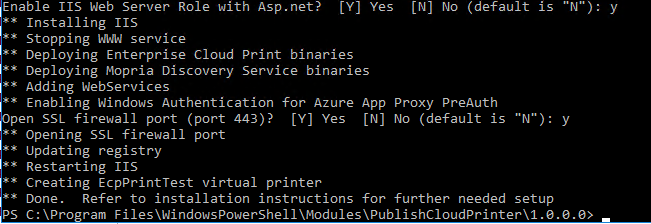
Now change directory to "C:\Program Files\WindowsPowerShell\Modules\PublishCloudPrinter\1.0.0.0" and then run .\CloudPrintDeploy.ps1 -AzureTenant You can get the tenant domain name and ID from the Azure AD overview page. It should run through and may ask a couple of questions, and will look something like this when done:
Now have a look in regedit and go to HKEY_LOCAL_MACHINE\SOFTWARE\Microsoft\Windows\CurrentVersion\CloudPrint and make the following changes:
EnterpriseCloudPrintService\AzureAudience = the Application ID URI of the EnterpriseCloudPrint app MopriaDiscoveryService\AzureAudience = the Application ID URI of the MopriaDiscoveryService app MopriaDiscoveryService\URL = the Application ID URI of the MopriaDiscoveryService app
Next, still in the elevated PowerShell window, run iisreset.
Now open IIS Manager and configure the Default Web Site for SSL. You'll need either a self signed certificate or one from your CA if you have one.
Back in your elevated PowerShell window run the following command to register the NuGet package source:
and then install SQLite - I've gone for a fixed version number as trying the latest version at time of writing was a bit of a mess - dependency loop errors etc.
Now we need to run the following code to copy the DLLs into the Mopria folder.
Next open C:\inetpub\wwwroot\MopriaCloudService\web.config in a text editor and update the version number to what we have just downloaded in this part of the file:
Now you need to download the SQLite tools from the SQLite Download Page - it's the ones called Precompiled Binaries for Windows, and you want the tools zip. Extract these to somewhere, in this case I've gone with c:\sqlite, and run the following:
c:\sqlite\sqlite3.exe "c:\inetpub\wwwroot\MopriaCloudService\Database\MopriaDeviceDb.db"
This will then open a SQLite shell where you need to enter:
Note the forward slashes in the command as it doesn't like backslashes. This should give you a file called c:\inetpub\wwwroot\MopriaCloudService\Database\MopriaDeviceDb.db - find this in File Explorer, go to its Properties and then Permissions. You will need to grant the user you want to be able to publish printers Full Control to this file.
Go to Intune > Devices > Configuration profiles and create a new profile. This is going to be targeting Windows 10 and later, and it will be a Device Restrictions profile. Run through the wizard setting the following under Cloud Printer:
Printer discovery URL - the MopriaDiscoveryService app's External URL off the Application Proxy page, but without the trailing /. (under Enterprise Apps) Printer access authority URL - https://login.microsoftonline.com/ Finally go through the standard Assignment screen and complete the wizard.
Add a printer to your print server, and share it and assign users the relevant permissions. You'll now need to prepare a few things for use in a PowerShell script so pop these into a text editor. Yes they are all required fields unfortunately.
Now log on to an Azure AD joined Windows 10 machine as a user which is synced from AD to Azure AD and has admin rights, and permission to manage printers. Open an elevated PowerShell window and run:
Install-Module PublishCloudPrinter
You will now need to put your command together from the values you have gathered in your text editor. The command you need to run is Publish-CloudPrinter and it should look a little like:
With any luck you'll get a message saying it has been published and it will spit out the URL and UUID. If you get an error message relating to "unexpected character encountered while parsing value" double check you've got the OrgLocation correct (including the quotes).
Log on to a device which you targeted with the Intune profiles (you might need to go to Intune > Devices > Windows devices and click on the device, then click Sync if you're impatient)
Open the Settings app, and go to Devices > Printers and Scanners. Click on Add Printer and it should eventually show your cloud printers. On my setup it popped up and made me log in, which wasn't ideal but probably to do with ADFS being involved in my setup.
Unfortunately this doesn't support the more advanced features of PaperCut which require the print client - which obviously won't work with Cloud Print.
Register-PackageSource -Name nuget.org -ProviderName NuGet -Location https://www.nuget.org/api/v2/ -Trusted -Force
Install-Package system.data.sqlite -RequiredVersion 1.0.113.0 -ProviderName nuget
$source = "\Program Files\PackageManagement\NuGet\Packages"
$core = "System.Data.SQLite.Core"
$linq = "System.Data.SQLite.Linq"
$ef6 = "System.Data.SQLite.EF6"
$version = "1.0.113.0"
$target = "C:\inetpub\wwwroot\MopriaCloudService\bin"

xcopy /y $source\$core.$version\lib\net46\System.Data.SQLite.dll $target\
xcopy /y $source\$core.$version\build\net46\x86\SQLite.Interop.dll $target\x86\
xcopy /y $source\$core.$version\build\net46\x64\SQLite.Interop.dll $target\x64\
xcopy /y $source\$linq.$version\lib\net46\System.Data.SQLite.Linq.dll $target\
xcopy /y $source\$ef6.$version\lib\net46\System.Data.SQLite.EF6.dll $target\
<dependentAssembly>
  <assemblyIdentity name="System.Data.SQLite" culture="neutral" publicKeyToken="db937bc2d44ff139" />
  <bindingRedirect oldVersion="0.0.0.0-1.0.113.0" newVersion="1.0.113.0" />
</dependentAssembly>
<dependentAssembly>
  <assemblyIdentity name="System.Data.SQLite.Core" culture="neutral" publicKeyToken="db937bc2d44ff139" />
  <bindingRedirect oldVersion="0.0.0.0-1.0.113.0" newVersion="1.0.113.0" />
</dependentAssembly>
<dependentAssembly>
  <assemblyIdentity name="System.Data.SQLite.EF6" culture="neutral" publicKeyToken="db937bc2d44ff139" />
  <bindingRedirect oldVersion="0.0.0.0-1.0.113.0" newVersion="1.0.113.0" />
</dependentAssembly>
<dependentAssembly>
  <assemblyIdentity name="System.Data.SQLite.Linq" culture="neutral" publicKeyToken="db937bc2d44ff139" />
  <bindingRedirect oldVersion="0.0.0.0-1.0.113.0" newVersion="1.0.113.0" />
</dependentAssembly>
.read "c:/inetpub/wwwroot/MopriaCloudService/Database/MopriaSQLiteDb.sql"
.exit
Configure the Intune policies
Publish a printer
Publish-CloudPrinter -Printer "TestPrinter" -Manufacturer "Mfr" -Model "Model" -OrgLocation '{"attrs": [{"category":"country", "vs":"UK", "depth":0}, {"category":"organization", "vs":"KatysTechBlog", "depth":1}, {"category":"site", "vs":"Manchester", "depth":2}]}' -Sddl "O:BAG:DUD:(A;OICI;FA;;;WD)" -AzureTenantGuid xxxxxxxx-xxxx-xxxx-xxxx-xxxxxxxxxxxx -AzureClientId xxxxxxxx-xxxx-xxxx-xxxx-xxxxxxxxxxxx -DiscoveryEndpoint https://mopriadiscoveryservice-katystechblog.msappproxy.net/mcs -PrintServerEndpoint https://enterprisecloudprint-katystechblog.msappproxy.net/ecp -DiscoveryResourceId https://mopriadiscoveryservice-katystechblog.msappproxy.net/mcs/
Testing
Further Reading
In this post
- Introduction
- Set up the Application Proxy server
- Set up the Application Registration configuration in Azure
- Configure the Print Server
- Configure the Intune policies
- Publish a printer
- Testing
- Further Reading
Support My Work
I hope you find my content useful. Please consider tipping to support the running costs of hosting, licensing etc on my Ko-fi page.
