
Windows 365 Cloud PC
Windows 365 Cloud PC is Microsoft's latest addition to the VDI scene. Announced at Inspire back in July, and then released General Availability on 2nd August 2021. On a basic level, you provision a Windows 10 (or 11) VM to a user, and it's dedicated to that user - so effectively the same as a standard PC in that you're not sharing resources in a multi-user environment as you may do with Azure Virtual Desktop. Licensing is made simple as it's a fixed price per user, per month, regardless of how much usage they make. There's a variety of different SKUs which correspond to different VM specifications.
Windows 365 comes in two versions - Business and Enterprise. Business is limited to 300 users and designed to be much simpler to set up and configure. Enterprise does not have a user limit and integrates with Endpoint Manager (Intune). The core difference here is Business could be implemented by anyone at the company, Enterprise will most likely require an IT department to manage it.
This does not replace Azure Virtual Desktop - it runs along side it. Azure Virtual Desktop requires more technical expertise to set up and manage, and can be more expensive or less expensive than Windows 365 depending on your host sizes, whether you share devices with Windows 10 multi-user, and whether you shut them down or not. Windows 365 is a fixed price with no knowledge of Azure Virtual Desktop and RDS required.
I'm going to look at the setup process for Business and Enterprise and give my thoughts.
Windows 365 Enterprise has some licensing and other technical requirements:
- Users licensed for Windows 10/11 Enterprise
- Users licensed for Endpoint Manager (Intune)
- Users licensed for Azure AD P1
- Connectivity to an existing Active Directory infrastructure (on-premise via VPN or Azure VM)
- Azure AD Connect sync with hybrid domain join enabled
The licenses required can be obtained by the user being licensed for Microsoft 365 E3 or higher, or Microsoft 365 Business Premium, they don't have to be obtained separately. The AD connectivity is required because Windows 365 Enterprise requires hybrid Azure AD joined machines - at time of writing Azure AD join was not available, however it has recently been made available. For now this post will cover hybrid setup.
Windows 365 Business does not have any of these requirements and is Azure AD joined.
First step for both of these is to buy the licences - you can do this through the Microsoft 365 admin portal "Purchase Services" section, or via whatever route you currently use to licence M365. There are 60 day trial licences available however at time of writing they were no longer available due to the level of demand.
The available plans (vCPU, RAM, Storage) are the same for both Business and Enterprise. The Business licensing is roughly £3.40 per month more than the Enterprise, unless you bring your own Windows licence via the Windows Hybrid Benefit - in which case, the pricing is the same. The three core plans are shown with pricing below:

There's loads more plans available, their details and pricing can be found at Windows 365 Plans and Pricing | Microsoft.
If you're using the Business version, once you've assigned the licence to a user in either M365 Admin Centre, or Azure AD all you have to do is wait a few minutes and direct the user to windows365.microsoft.com where their Cloud PC should be provisioning itself and will soon be ready for use. You're finished and can go relax!
For the Enterprise version, you will need to head over to Microsoft Endpoint Manager (Intune) and run through a few setup tasks. Navigate to Devices > Windows 365 and you should see the overview screen.

As a lot of the setup we will be doing uses the standard Intune assignment screen, we'll need to put the Windows 365 licensed users into a group in Azure AD. In my case I've just made a single group called "Cloud PC Users", but if you have sets of users you wish to assign different profiles to, you could create groups accordingly.
Enterprise: Set up On-premises network connection
Now we need to set up the on-premises network connection. This does not need to actually connect to anything physically on-premises, it can just be an Azure VM running Windows Server with Active Directory set up. Click on Create connection

Fill out the wizard with your network details - in this case I've picked my existing Azure Virtual Network and Subnet in which my Azure VMs and VPN gateway are located - and your AD domain details, including an account which can join devices to the domain. This does not need to have Domain Administrator privileges, just sufficient to join devices to the domain. I've just used administrator as this is a lab demo.

Once that's complete, you should see your connection showing with the status "Running checks". This takes a good 5-10 minutes to complete, once done you'll see this change to "Checks successful". If there are any warnings, you can click on the status text to bring up the detail:

Enterprise: User Settings
You can configure user settings if you wish - click on User settings tab then Add, and follow through the wizard and assignment details, choosing to assign this to one of the groups of Cloud PC users created earlier. At the moment the only setting here is whether the Cloud PC user receives local admin rights or not.

Enterprise: Provisioning policies
Now we're on to the fun bit, provisioning the Cloud PCs. Click on the Provisioning policies tab and Create policy. Work through the wizard, setting a policy name and selecting your On-premises network connection on the General screen. On the Image screen you'll select which image you want to use - this can be a Gallery Image, or a Custom Image. I'll cover uploading custom images later on, so for now we're going to look in the gallery and pick a Windows 10 + M365 apps image.

Finally assign this to the Cloud PC Users group created earlier, and complete the wizard. Now going to the All cloud PCs tab you should see that your Cloud PCs are provisioning.

Enterprise: Managing Cloud PCs
As the Enterprise Cloud PCs are integrated into Endpoint Manager, you can manage them as you would any Windows device - assigning policies, profiles, applications etc. These devices show up with names such as "CPC-test-M93-ZD" where test is part of the username. I'm not sure how these are generated, but when looking in MEM just look out for devices beginning CPC.
When viewing the device in MEM, you'll notice a couple of extra items on the toolbar - Reprovision and Resize. Resize will allow you to change to any of the other SKU, provided you already own a licence for it.

Enterprise: Custom Images
You can add custom images if you wish. You will need to prepare these on Hyper-V generation 1 VM, and your disks must be VHD form (not VHDX) and they must be fixed size (not dynamic). They must be running Windows 10 Enterprise, and once you've done your customisations you need to run Sysprep on the VM and tick Generalize.
Once you've got your VHD ready, you will need to upload it to an Azure storage account, and then go to Images > Create within the Azure portal. When it's uploaded, you can go to the Device images tab within the Windows 365 section of MEM, and add your image. This image can then be selected in the provisioning policy.
End-User Experience
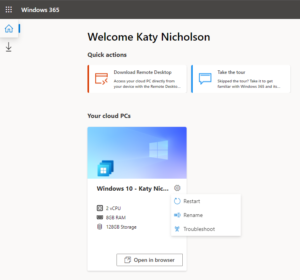
Once you've got the Cloud PC provisioned (either by simply assigning the licence for Business, or completing the setup and provisioning for Enterprise), the end user simply goes to windows365.microsoft.com and logs in with their credentials. They'll first go through a few Welcome screens and finally be shown their assigned Cloud PCs.

You'll notice on the settings menu you can Restart/Rename/Troubleshoot - for the Business version you'll also get the option to Reset - this will erase and re-provision the Cloud PC. Enterprise users will need an administrator to reprovision their Cloud PC from within MEM.
Using a modern browser, you can connect to your Cloud PC via the HTML5 client by clicking Open in browser. You'll be asked to log in to the VM (hopefully they will introduce SSO for this step in the future, as it adds a second login to both Azure Virtual Desktop and Windows 365). When it's finished logging on you'll just see a standard Windows desktop, and you can make this full screen via the toolbar buttons.

Other connection routes are via the various Remote Desktop apps, which can be downloaded from the windows365.microsoft.com portal for Windows, Mac, iOS and Android.
My thoughts
Overall the setup process for this was quite straightforward, especially the Business version which can be set up by anyone who can work their way round assigning licences in M365. I don't see this replacing Azure Virtual Desktop at all - but for people new to VDI, there's now an option they may be able to implement with their existing skillset with a fixed monthly cost.
There's a couple of things that I'd like to see in future - Azure AD join for the Enterprise version, removing the need for the on-premises connection and a traditional Active Directory infrastructure - the good news is that this feature is coming soon. I'd probably still keep the on-premises connection so that you can place the Cloud PCs on the same virtual network as your other infrastructure if you want, but remove the requirement for hybrid join. I'd also like to see the User Settings section expanded - although I'd expect most of the configuration you might like to do can be done through existing policies and profiles within MEM/Intune.
Having set up both this and Azure Virtual Desktop I think it is a welcome addition to the market and hopefully will do well. I've not done any of the maths to work out quite how it differs from an equivalent sized Azure Virtual Desktop setup in costing but that can be a future post.
In this post
- Introduction
- Enterprise: Set up On-premises network connection
- Enterprise: User Settings
- Enterprise: Provisioning policies
- Enterprise: Managing Cloud PCs
- Enterprise: Custom Images
- End-User Experience
- My thoughts
Support My Work
I hope you find my content useful. Please consider tipping to support the running costs of hosting, licensing etc on my Ko-fi page.
