
AVD: Getting Started with Azure Virtual Desktop
Azure Virtual Desktop (previously named Windows Virtual Desktop) is exactly as it sounds - a Virtual Desktop solution in Azure! While many of us are familiar with Windows Server Remote Desktop roles, and if we think back far enough - Terminal Services, AVD is an exciting cloud based take on this.
So the first question I think we should tackle is "Why do I need this?" - Why can't we just use some Server 2022 VMs in Azure running the standard RDS roles - Session hosts, brokers, gateway etc? Well - you can do that if you want, but you're then paying compute costs for your session hosts, brokers and gateways, setting up a public IP address and opening ports. With AVD the broker and gateway are provided on Azure and they're free - all you pay is the cost of the Session Host VMs.
Another point here is that with AVD you can use Windows 10 (or 11) Multi-session edition, designed for virtual desktops. No more trying to shoehorn Server with Desktop Experience into place.
The next bit of discussion would come around - "What about Windows 365 Cloud PC? Why should we use AVD instead?". The answer to this is "It depends". You need a clear view of what your usage is going to be like - are you dedicating hosts to users on a 1:1 ratio? Do you need to run your hosts 24/7? The main differences in cost here are that Windows 365 is a fixed price per user, regardless of whether that user logs on for an hour a day or 20 hours a day. With AVD you are paying for the host VMs, and you can shrink and grow your host pool depending on expected demand.
Finally, Windows 365 is technically in a different product group to AVD so will have a slightly different target market. Windows 365 sits with Microsoft Endpoint Manager and is designed to be easy to set up from MEM. AVD sits with Azure - not as easy to set up, but more flexible. You can read more about the differences between AVD and Windows 365 on the Microsoft Docs page.
As this post is called 'AVD: Getting Started', I'll obviously have picked AVD over those other options here. I will run through setting up a basic host pool and publishing the session desktop, along with a couple of different methods of accessing it.
Pre-requisites
If you want to join an Active Directory domain, you will need domain join credentials and connectivity to a domain controller. This could be an Azure VM running either in the same VNet or in another VNet with the appropriate network rules in place, or a domain controller running on-premise if you have ExpressRoute or a VPN between your site and your Azure VNet.
More recently, Azure AD join has been rolled out to AVD. There aren't any pre-requisites as such for this, however there are a few extra steps along the way which are required for users to be permitted to log on to an AzureAD joined host.
For both options, your users need to be in Active Directory and synced to Azure AD. At some point in the future this requirement will be dropped for Azure AD joined hosts, supporting cloud-only user accounts.
Licensing
AVD can run a few different versions of Windows, each has its own licensing requirement:
- Windows 10 (or 11) Enterprise multi-session: Windows A3/A5/E3/E5 or M365 A3/A5/E3/E5/F3/Business Premium
- Windows 7 Enterprise: Same as Windows 10/11
- Windows Server 2012R2 and above: RDS CAL with Software Assurance
Create the Host Pool
Our first step is creating the host pool. Open the Azure portal and head to Azure Virtual Desktop > Host pools and click on Create.

For production environment I'd recommend making a new resource group for this. If you're going with AzureAD joined, there are some settings we need to apply to all host VMs a bit later one which are easier if we can just apply them at the resource group level and let inheritance take place.
Generally I set Host pool type to Pooled - this will allow multiple users to log on to each host, vs dedicating a host to a user.
There are two load balancing algorithms to choose from:
- Breadth-first: Distributes new connections across all hosts in the pool
- Depth-first: Distributes new connections by filling each host to its maximum count before starting on the next host
Finally max session limit - if you are using depth-first load balancing, or plan to use auto-scaling, you'll need to put a number in here which denotes the maximum concurrent sessions you want on each host.

Moving on to the next page, Virtual Machines. Here we will configure the resource group, VM name prefix, location and availability options for our VMs. Select the image you want from the gallery (you can upload a custom image and select that here, but I will cover that in a future post), along with the VM size you wish to use, and the number of VMs.
When considering the size of the VM you want to use - I tend to go for multiple smaller VMs over one or two huge VMs as it makes it easier to take a host VM down for maintenance without vastly reducing the availability. Another factor to consider with sizing is what kind of load you are expecting, and how much you want to watch the budget. With multiple, smaller VMs you can shut down most of your host pool overnight to save costs, and boot them back up when the workload is predicted to be higher. With the 'Start on connect' feature you can even turn ALL the host pool off, and it will boot up a VM automatically when a user tries to connect.
Scrolling down, fill out the network details and domain join type. If you are joining an AD domain you'll need the UPN and password for an account which can create computer objects in the domain. If you're joining Azure AD, you can also enroll the VMs with Intune if you like.
Finally, set the VM local administrator account credentials, and complete the setup process.
Once it's spent a while deploying the host pool servers, you should then be able to click on the host pool and see an overview screen like below.

Configure Applications
For the purposes of this post, all we are going to do is configure the session desktop. In a future post I'll cover remote apps fully. Hopefully the setup process has created an Application group and an application for you - go into Azure Virtual Desktop > Application groups, and click on the application group, in my case named KatyAVD-DAG.
Your application group should have 1 application - Session Desktop. Click on Assignments to assign this to the users or groups you wish to have access.
Create a workspace
Now go to Azure Virtual Desktop > Workspaces and create a workspace. Complete the Basics screen and then skip to Review + create. Then go into the workspace, then Application Groups, and add your application group.
Configure Other Settings
Go to Azure Virtual Desktop > Host pools, and click on your host pool. Within the Properties screen, you can alter the load balancing algorithm and max session limit, along with toggling the Start VM on connect feature.
Clicking on RDP Properties you can set the properties used for the connection e.g. session behaviour, redirected resources etc.
If you have Azure AD joined your host pool, you will need to click on Advanced and add 'targetisaadjoined:i:1' in to the RDP properties.
Another item to note is Scaling plan. I'm not going to cover this here but this is where you would specify which scaling plan to use for this host pool. These are currently in preview and not available in all regions.
If you are using AD Domain joined hosts, you will need to make sure that the users have permission to log on to the host - for example by placing the user group within each host's Remote Desktop Users local group.
Azure AD Role Assignment
When I ran a hybrid joined setup, logging on as a user worked fine. With Azure AD joined I got an error message - to fix this, each host VM will need the RBAC role 'Virtual Machine User Login' assigned to the groups you wish to be able to logon. Ideally you'd do this at the resource group level, assuming you've used a new resource group for AVD.

Testing
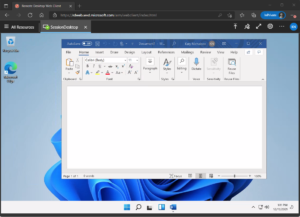
Now you go to Remote Desktop Web Client (microsoft.com) and hopefully the Application group you assigned will appear. Click on SessionDesktop to load the web client. This URL is not specific to your installation and is the global URL used for accessing AVD.

If you get a sign-in error, it's likely you are using AzureAD joined hosts and haven't configured the RDP Properties, or assigned the Virtual Machine User Login role.

Within the Settings for the web client, you can configure it to download an RDP connection file instead of opening in the web client. This will give you an rdpw file, which requires the new Windows Desktop client.
The web client has a logging tool for troubleshooting - click on the menu > About > Capture support info > Start recording. You can then attempt to connect again, and then return to that menu to stop recording. It will then give you a log file to examine. Another method I used when troubleshooting the RBAC roles and RDP file was to try connecting to the host directly using RDP, bypassing the AVD gateway/broker completely. Once I'd got this to work, I knew the issue was with the web client itself rather than the VM.
Managing Hosts
You can manage individual hosts by going to your host pool and clicking on Session Hosts. Here you can assign a host to a user (if you are not using the pooled mode), and enable/disable drain mode. Drain mode is used to prevent new connections to a host server, if you wanted to perform some maintenance on a host VM you can use this in conjunction with logging the existing users off.
Clicking onto a specific host you will be able to see the currently logged on sessions, and interact with them eg by sending a notice or logging them off.

From the Session Hosts page you can also add additional session hosts. This process takes you to the same steps you completed earlier, where you can specify the gallery image, VM size, number of VMs etc.
Further Reading
In this post
- Introduction
- Pre-requisites
- Licensing
- Create the Host Pool
- Configure Applications
- Create a workspace
- Configure Other Settings
- Azure AD Role Assignment
- Testing
- Managing Hosts
- Further Reading
Support My Work
I hope you find my content useful. Please consider tipping to support the running costs of hosting, licensing etc on my Ko-fi page.
