AVD: Applications
As with Remote Desktop Services, we can use AVD to host applications. We can choose to log the user into a full remote desktop. where they can then access the applications they require manually, for example off the Start Menu, or we can use Remote App. Remote App with AVD is a similar experience to that of RDS - the user sees the application launch as if it was a local application - the difference with AVD being that Remote Apps don't have to be installed on the host directly, and can reside in an MSIX container, and the method of presenting these to AVD is MSIX App Attach.
There's a few different ways you can approach presenting applications to the user, which I will cover in this post.
Installed on Host Server
One method would be to install the applications on each host VM. You can install these using any standard method you would use to install an application - e.g. Group Policy start-up script (if your AVD VM is hybrid joined, rather than native AADJ), pushed out through Intune, Config Manager or for the very small deployment you might even manually install them. These applications would then be available to the user through the remote desktop. While the advantage to this method would be "We know how to do it, done this before", it really is worth the up-skilling to look at App Attach - the main downsides to this approach are:
- Deployment takes longer - When you add additional session hosts, you will have to wait for the applications to install. While you can get around this by creating a master image containing the OS and all applications, and use this as the source for the host deployment, I find it much better to be using a gallery image with minimal applications pre-loaded - e.g. Windows 11 with 365 Apps.
- OS Updating is more complex - With pooled hosts, one method of updating would be to just build new session hosts from an updated image, and run through a rolling process which swaps the disks out on each host for the fresh one. If all your applications use App Attach, you can use this method to update and the fresh hosts will already have access to the applications.
- Application Updates are more complex - you would need to update the application on each individual host. While this can be done via Intune/Config Manager or other methods, having a single MSIX container for your app which covers your entire AVD setup is much simpler.
You've convinced me, how do we do MSIX App Attach?
The first step is to package your applications as MSIX format. You can read how to do this in one of my previous posts. Once you have your MSIX files, these then get expanded into an MSIX container (which is just a VHD file). You can have one or multiple MSIX in a single container, and you can attach multiple containers to AVD. The applications in these containers can then be configured as Remote Apps, but they will also appear on the start menu on the session desktop. The applications run from the VHD, so they do not actually get installed on the hosts - if you go looking for them in Program Files they won't be there.
The MSIX containers need to be stored somewhere that the VM has access to - which will typically be a share on another VM, or an Azure File Share. The process for Azure AD Joined hosts may differ, I will cover this at a later date.
For the purposes of this post I will be using a file share hosted on a VM joined to the same domain as the session hosts. If you want to use a file share instead, take a look at Christiaan's blog about it. It's quite a long process, especially configuring AD authentication for the storage account file share.
Expanding the MSIX into the container
The process of expanding the MSIX into the container is done by a tool called MSIXMgr. You can download this from https://aka.ms/msixmgr.
In PowerShell, run the following script. Make sure to edit it to suit your needs:
New-VHD -SizeBytes 100MB -Path C:\temp\myapps.vhd -Dynamic -Confirm:$false
$vhd = Mount-VHD c:\temp\notepadpp.vhd -Passthru
$disk = Initialize-Disk -Passthru -Number $vhd.Number
$partition = New-Partition -AssignDriveLetter -UseMaximumSize -DiskNumber $disk.Number
Format-Volume -FileSystem NTFS -Confirm:$false -DriveLetter $partition.DriveLetter -Force
mkdir ($partition.DriveLetter + ":\Application")
msixmgr.exe -Unpack -PackagePath c:\temp\NotepadPP_1.0.1.0_x64__xxxxxxxx.msix -Destination ($partition.DriveLetter + ":\Application") -ApplyACLs
msixmgr.exe -Unpack -PackagePath c:\temp\Putty_1.0.1.0_x64__xxxxxxxx.msix -Destination ($partition.DriveLetter + ":\Application") -ApplyACLs
Dismount-VHD c:\temp\myapps.vhd
- New-VHD line: Set the size to something suitable which will be large enough to fit your applications. Set the path appropriately to where you wish to save the VHD, and reference this in both Mount-VHD and Dismount-VHD lines.
- msixmgr lines: One line per application that you wish to expand into this container. In this example I've put Notepad++ and puTTY into my container.
Once you've got your VHD file, save it to the file share you created earlier - whether this is on another VM, or an Azure File Share. Now go to AVD > Host Pools, click on your host pool, then click on MSIX packages.
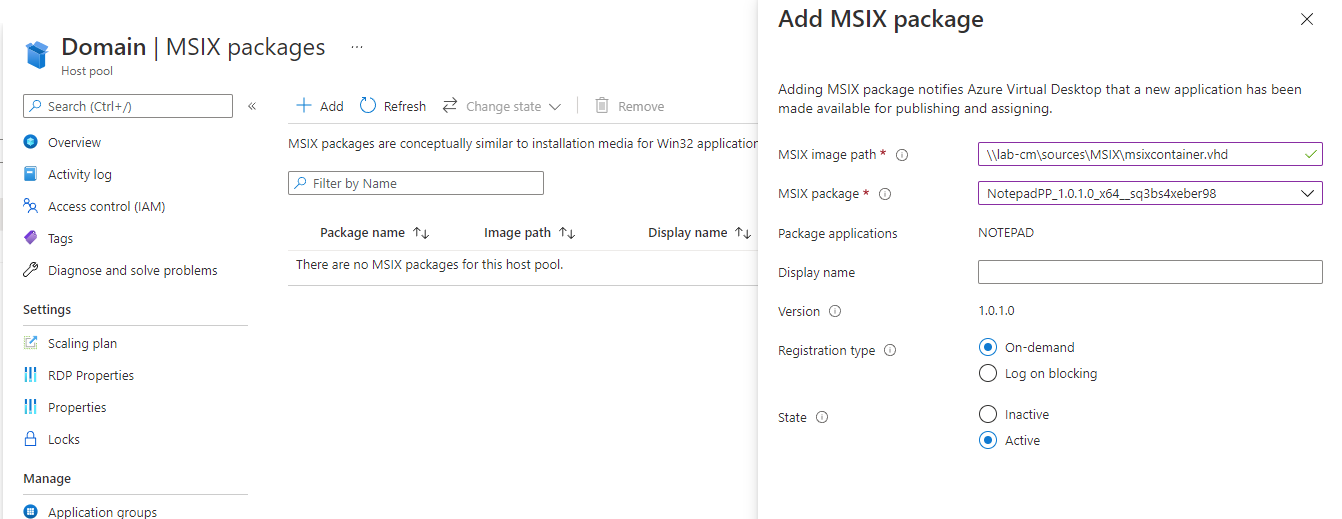
Now click on Add to add your first package. Enter the network path to your VHD file, and then select which package within the VHD you wish to add. You can optionally specify a display name, and set the registration type and state. The state needs to be set to 'Active' for the app to be available to users.
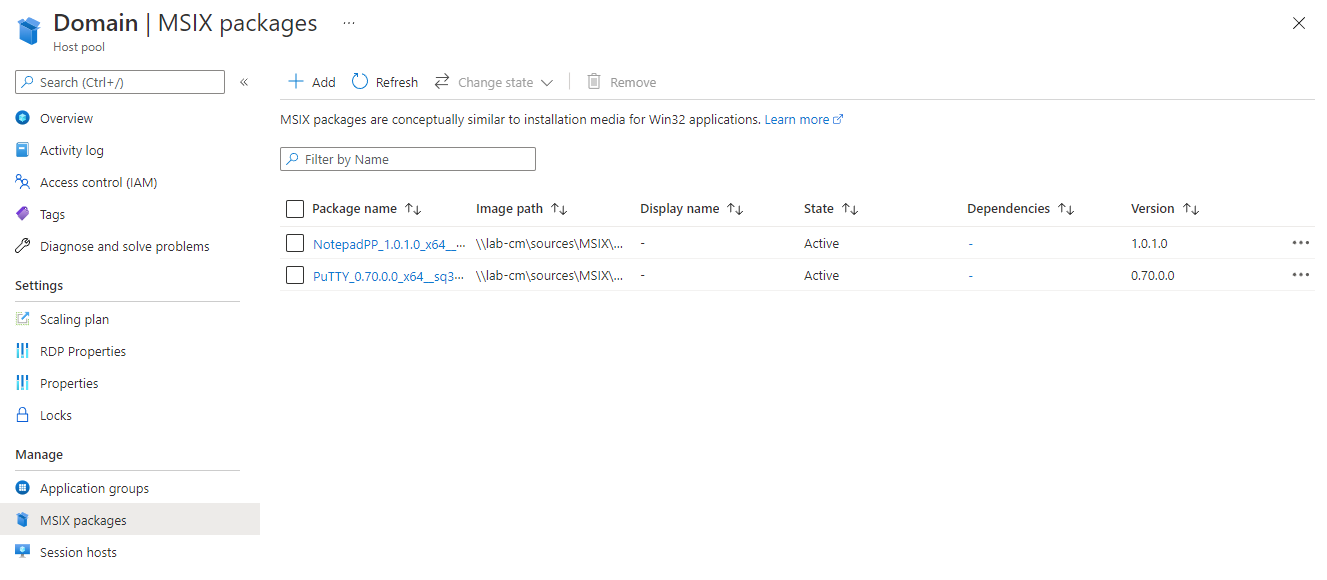
Repeat this process for each of your application packages and VHDs. Once complete, you should have a list as below.
Next go into Application Groups, and create an application group - set the group type for this to RemoteApp. You can have multiple application groups, but session desktop and Remote App can't be mixed within a single application group. Click on your new RemoteApp Application Group, then Applications, then Add.
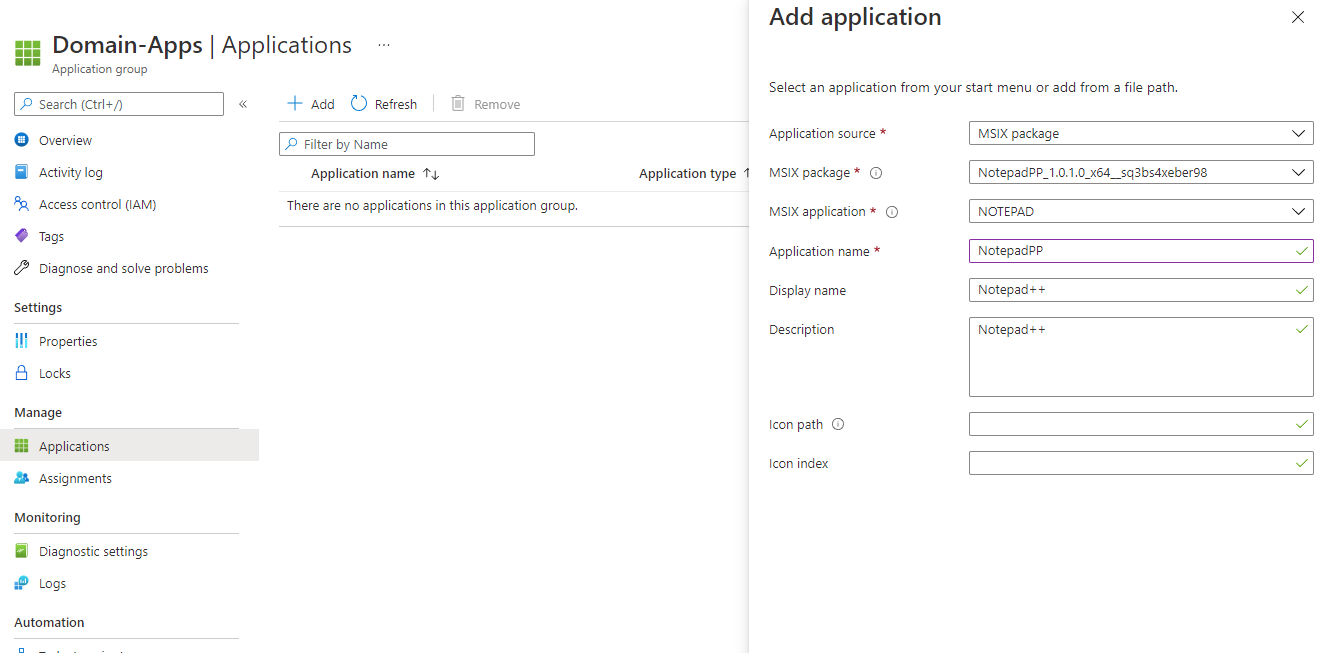
Select MSIX package application source, and then from the MSIX package dropdown, select the package you wish to add. Finally, select the application within that package from the application dropdown field. Add the Application Name, and optionally display name, description and icon details, then Save.
The other options for Application Source here include Start Menu, which lists the applications found on the default Start Menu, and File. You would select the source as File to add a traditional Remote App i.e. an application that has already been installed onto each of the hosts.
Finally, click on Assignments and assign this application group to the appropriate users.
User Experience
When a user launches the web client, they should now see the remote apps assigned along with any session desktop that has been assigned. In this example I have two workspaces - Desktop is an AzureAD joined pool, Domain is a hybrid joined pool. As Azure AD Join is a new feature I haven't yet looked at it in much detail, so MSIX App Attach for Azure AD Joined hosts will come in a future post.
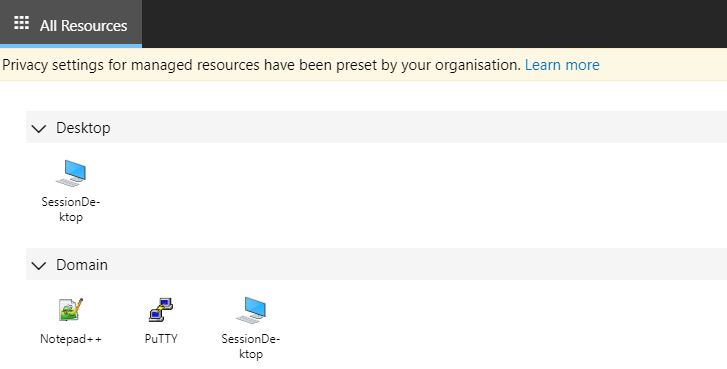
In the web client you'll notice that the remote apps are stuck in the browser, and if you resize the app itself that it's just floating on a black screen. To get a much better experience make sure you're using the AVD client. You can use this in conjunction with the web client if you configure Resources Launch Method to Download the rdp file, this is controlled in the Settings menu within the web client. Alternatively have your users entire process done via the AVD client. You can find out more about the client at Connect to Azure Virtual Desktop with the Windows Desktop client - Azure | Microsoft Docs (64 bit version direct download link: https://go.microsoft.com/fwlink/?linkid=2068602)
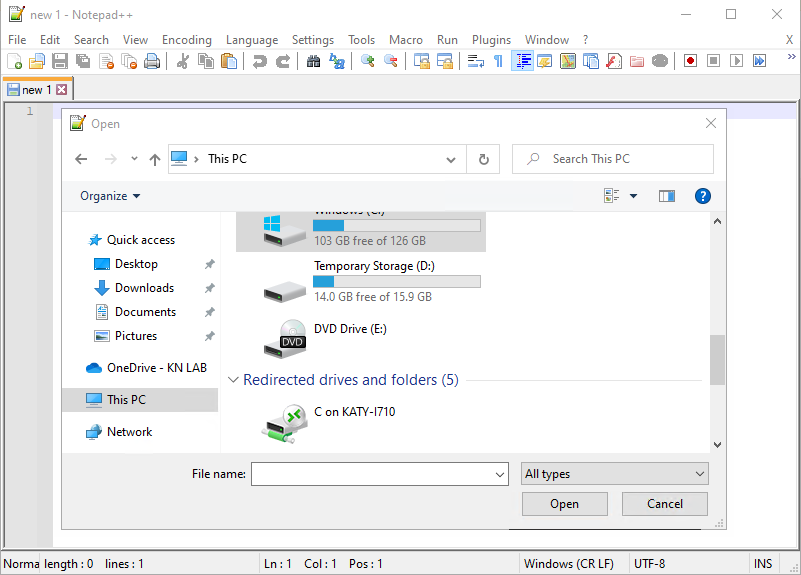
Using the AVD Client, the user experience is similar to RDS RemoteApps in the past few years. The app behaves as if it was a local app and appears in the taskbar. The only real differences from a local app, from the end user perspective, is that there is a little marker on the icon in the taskbar, and if you try to browse any open/save file dialogs you will be shown the drives on the session host, not your local device - although with device redirection these can still be accessed.
Further Reading
- Enable AD DS authentication to Azure file shares | Microsoft Docs
- Learn here how to configure Azure Files with Active Directory (AD) authentication for Azure Virtual Desktop - FSLogix Profile Container and MSIX app attach | christiaanbrinkhoff.com - Sharing Cloud and Virtualization Knowledge
- Azure Virtual Desktop MSIX app attach portal - Azure | Microsoft Docs
- Azure Virtual Desktop prepare MSIX app attach image - Azure | Microsoft Docs
In this post
- Introduction
- Installed on Host Server
- You've convinced me, how do we do MSIX App Attach?
- Expanding the MSIX into the container
- User Experience
- Further Reading
Support My Work
I hope you find my content useful. Please consider tipping to support the running costs of hosting, licensing etc on my Ko-fi page.

