Azure AD and Windows Hello: SSO to on-premises resources
One of the main reasons people might choose a hybrid Azure AD joined configuration for their devices is that they still want to be able to access on-premises resources, for example a file server, or printers. In my opinion, hybrid join should be avoided and it is usually worth the extra work required on the infrastructure to support your devices being Azure AD joined and having no relationship to the AD domain.
In this post I'll look at how SSO to on-premises resources actually works, when you are logged on to an Azure AD joined device, with a user account which is synced from your on-premises AD. I'll also look at how you can configure this so that users logging on using Windows Hello for Business can also SSO.
Initial Sign-in SSO (username and password)
If the user has signed in using their Azure AD credentials, you will automatically get SSO to on-premises resources. It should "just work" with no configuration changes needed, provided that the device can contact the on-premises domain controllers and the resource you're trying to access - whether that is through the device physically being sat on the same LAN, or via VPN, and provided that your user accounts are synchronised from that domain via Azure AD Connect. If you have multiple domains you may need to alter the domain filtering in Azure AD Connect config.
When you sign in, Azure AD sends the on-premises domain details to the device with the Primary Refresh Token (PRT). The local security authority (LSA) on that device then enables NTLM and Kerberos authentication, which are required for accessing your on-premises resources.
Full details of how this works are on the Microsoft Docs.
WHfB based sign-in (PIN, Face ID etc)
Having this work out of the box where users sign in with their username (UPN) and password is neat, but I'd hope that on a modern deployment users are able to configure Windows Hello for Business (WHfB), as it's a much stronger authentication method than a password. Unfortunately, you won't be able to SSO to on-premises resources if the user logged on using WHfB without a few changes to the infrastructure configuration. This is because the WHfB key isn't present in Active Directory, your domain controllers won't be using the right certificates to satisfy the requirements of the device, and it's likely your certificate revocation lists (CRLs) are not accessible from a non-domain joined device.
There is a planning guide on the Microsoft Docs covering how to set this up, however it is quite lengthy and rather involved. I've also found that you don't need ADFS for this to work using the Key Trust model, the docs seem to imply that you do.
Find out more in the Microsoft Docs
There are two types of trust we can use for setting up the WHfB deployment:
Key Trust: Requires Windows Server 2016 domain controllers, users authenticate using a key created during WHfB setup. The public key is stored in Azure AD, and is then exported through Azure AD Connect to the relevant user account's msDS-KeyCredentialLink attribute in Active Directory.
Certificate Trust: Requires Windows Server 2008R2 domain controllers, although the schema must be at 2016 or later level. Users authenticate using a certificate. This requires a lot more work to issue user certificates, and in a federated environment you will need to enable Device Writeback.
I've chosen to go with the Key Trust model, for a couple of reasons. Firstly, for those of you who have been reading my blog for a while, the production network at work is set up in a way where Device Writeback can't be enabled - multiple domains on a single forest, each domain syncs to its own Azure AD tenant. It's also a lot less work on the certificates front to go with the key trust model, and a few other steps regarding permissions are configured automatically vs the certificate trust route.
Pre-requisites
- Windows Server 2016 or later domain controllers
- Azure AD Connect is running to sync your user accounts to Azure AD
- Certification Authority is already set up, optionally with the "Certification Authority Web Enrollment" feature
Now we need to configure the environment so that the WHfB public key gets written back to AD, and so that the certificates used by the domain controllers are suitable to pass the end-user device certificate checks.
When the device attempts to authenticate to the domain, the device validates the reply from the domain controller with the following criteria (taken from the Microsoft Docs page):
- The certificate hasn't been revoked.
- The domain controller has the private key for the certificate provided.
- The root CA that issued the domain controller's certificate is in the device's Trusted Root Certificate Authorities.
- Use the Kerberos Authentication certificate template instead of any other older template.
- The domain controller's certificate has the KDC Authentication enhanced key usage (EKU).
- The domain controller's certificate's subject alternate name has a DNS Name that matches the name of the domain.
- The domain controller's certificate's signature hash algorithm is sha256.
- The domain controller's certificate's public key is RSA (2048 Bits).
Configure Azure AD Connect
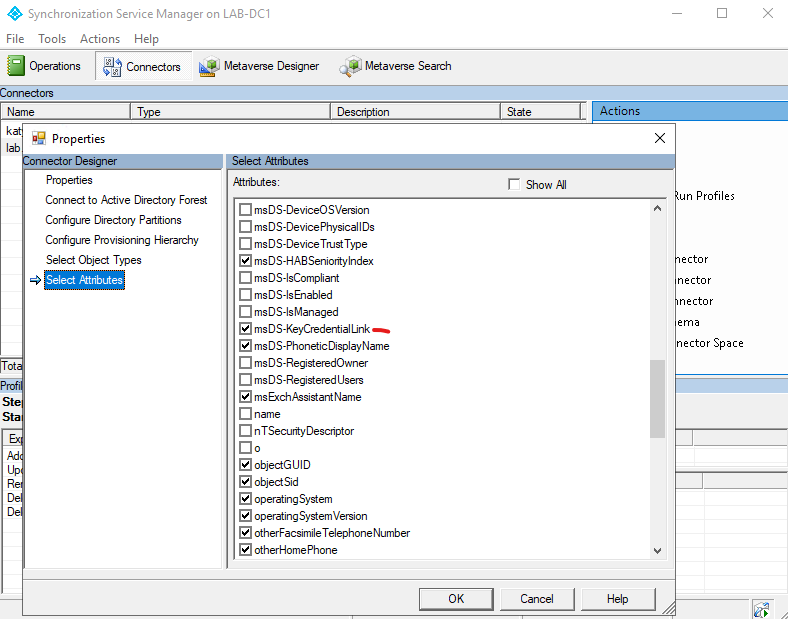
We need to make sure that Azure AD Connect is going to write back the user's WHfB public key into the msDS-KeyCredentialLink attribute. On the server running AADConnect, open the Synchronisation Service console. Click on the Connectors tab, then double click on the row labelled Active Directory Domain Services. Click on the Select Attributes page and make sure that msDS-KeyCredentialLink is selected.
Configure the CDP
So our first step is to make sure that the CRL Distribution Point (CDP) is accessible from the device. The default here is for it to be Active Directory integrated, and if you take a look through Certification Authority, right click on the CA, then Properties, then Extensions, you will see something similar to the following screenshot:
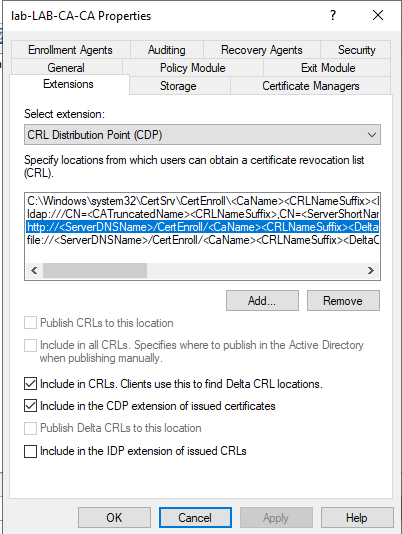
Here you need to make sure the http entry has both "Include in CRLs" and "Include in the CDP extension of issued certificates" ticked. While you can go into more depth here and get your CA to publish to a network share, and then host that on IIS (instructions for this in the Microsoft Docs), it's not really necessary for smaller deployments and will work fine through the CertEnroll virtual directory if you have the Certification Authority Web Enrollment_ role installed. You will also need to select the bottom row (file://) and tick "Publish CRLs to this location" - the path here should correspond with the http path if you are using CA WebEnrollment. Note that this does not need to be accessible to the entire Internet - just the devices you want to have SSO to on-premises resources. If your on-premises resources are behind a VPN, the CDP can also be behind the VPN.
Configure new Domain Controller certificate templates
Next we need to change the certificate template used by our domain controllers. Right click on Certificate Templates, then choose Manage Templates. Find the Kerberos Authentication template, right click it then Duplicate Template.
- On the Compatibility tab, select (Windows 7) / Windows Server 2008 R2 for both boxes.
- On the General tab, type a suitable name e.g. Domain Controller Authentication (Kerberos). Tick "Publish certificate in Active Directory".
- On the Subject Name tab, make sure this is set to build from AD, set the Subject Name format to "None", and make sure only DNS name is ticked. These should be the default settings anyway.
- On the Cryptography tab, change the Provider Category to "Key Storage Provider". Make sure the algorithm is RSA, minimum key size 2048. Select "SHA256" as the Request hash.
- On the Superseded Templates tab, add the older Domain Controller certificate templates.
- Click OK to create the new template
Back in the Certification Authority console, right-click on Certificate Templates and click New > Certificate template to issue. Find the template you just created - Domain Controller Authentication (Kerberos) - and click OK. If it doesn't show up, you will need to wait for replication across your AD infrastructure, also try refreshing the console.
Next is to disable the older templates, so find the following certificate templates in the console and right click > Delete:
- Domain Controller
- Domain Controller Authentication
- Kerberos Authentication
Configure auto enrollment for the domain controllers
Finally we need to configure auto enrollment in Active Directory. Open Group Policy Management Console, and create a new Group Policy Object in the Domain Controllers OU (or edit an existing one, if you already have one for auto enrollment). Expand Computer Configuration > Policies > Windows Settings > Security Settings > Public Key Policies and set the following two settings:
- Certificate Services Client - Certificate Enrollment Policy: Enabled, Active Directory Enrollment
- Certificate Services Client - Auto-Enrollment: Enabled, tick the boxes for Renew expired certificates, and Update certificates that use certificate templates
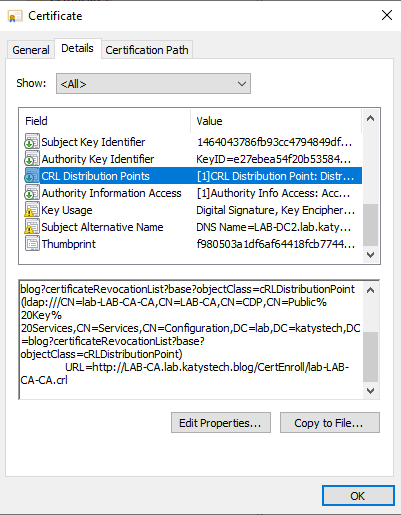
We can now wait a while, or run gpupdate on the domain controllers. Eventually you should see in the Certification Authority console, under Issued Certificates that a certificate using the new template has been issued to each of your domain controllers. Open the certificates and check that the CRL Distribution Points field, on the Details tab, includes the http address.
Verify CDP is accessible
Make sure you can access this from a device which is not joined to the AD domain. There should be no authentication prompts. The default URL will be similar to:
http://ca-server.domain/CertEnroll/Ca-Name.crl
If you're using Edge it will probably try to redirect you to https://ca-server.domain/CertEnroll/Ca-Name.crl, this can be disabled via going to edge://flags/#unsafely-treat-insecure-origin-as-secure and adding the CA server's FQDN.
Deploying the root CA certificate to the devices
The Azure AD joined devices will need to have a copy of your AD CA root certificate in their Trusted Root store. Export your root CA from the Certification Authority console by going to the CA Properties > General > Select the latest certificate > View certificate > Details > Copy to file. Save this as a Base64 encoded .CER file.
We need to deploy this - if you are using MS Endpoint Manager (aka Intune), we can do this using a configuration profile - in the Intune portal, go to Devices > Configuration profiles and click on Create profile. Select the platform (Windows 10 and later), then Profile type: Templates > Trusted certificate. If you're trying to deploy this to other devices, the profile type may be slightly different but it should be obvious which one is a trusted certificate.
Run through the steps, uploading the CA root certificate's .cer file you exported previously. Complete the assignments as required, and finish the wizard.
Testing
Log on to your Azure AD joined device with a synchronised user account, and set up Windows Hello for Business. Make sure that Azure AD Connect has synchronised once you've set this up - by default this will be every 30 minutes, you can manually force a sync by running Start-ADSyncSyncCycle -PolicyType Delta on the server running AADConnect. The obvious thing here that will need pointing out to the end user is that it can take up to 30 minutes after they've set up WHfB before they can access on-premises resources, as you're waiting for the sync to write back the public key.
Now check the properties of the user account in Active Directory. You may need to turn on Advanced Features, under the View menu, to see the Attribute Editor tab. The msDS-KeyCredentialLink attribute should have a value, and on the Object tab you should see that it was recently updated.
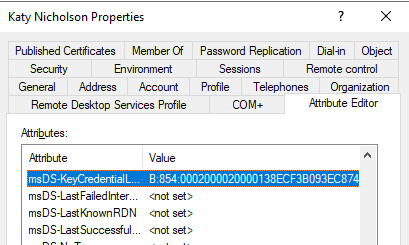
If the attribute has updated, then restart your device and sign in using WHfB. Now try accessing some on-premises resources - e.g. an SMB share or adding a shared printer. I'm not 100% certain on whether you need to use the FQDN when connecting - I tend to use it out of habit, but testing on a couple of different networks shows that you don't necessarily need to. You should also be able to use the Remote Server Admin Tools.
Troubleshooting
I ran into a few issues when setting this up. The error you are most likely to see is the prompt for authentication:
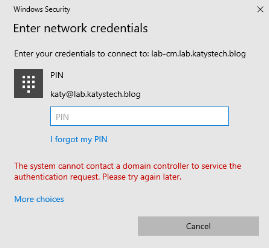
This doesn't tell you much, but examining the System event log brought up a couple more errors:
Event 9, Security-Kerberos. "The client has failed to validate the domain controller certificate for LAB-DC2.lab.katystech.blog. The following error was returned from the certificate validation process: The revocation function was unable to check revocation because the revocation server was offline."
Event 11, Security-Kerberos. "The Distinguished Name in the subject field of your smart card logon certificate does not contain enough information to identify the appropriate domain on an non-domain joined computer. Contact your system administrator."
The cause of this was that the system didn't think it could contact the CDP we set up earlier. Double check that the HTTP entry is listed in the CRL Distribution Point on the certificates issued by your CA, i.e. the ones currently in use on your DCs. Make sure you can access this without authentication from the endpoint device.
In my case, I went as far as examining the IIS request log on the CA server, to see if the device was even attempting to download the CRL. It wasn't so in the end I reset the device through Windows Settings > Update & Security > Reset. Following the reset, it all worked as expected first time so I can only suggest that the system was caching an old Domain Controller certificate, as I attempted to access on-premises resources before configuring the HTTP CDP.
Further Reading
- How SSO to on-premises resources works on Azure AD joined devices | Microsoft Docs
- Primary Refresh Token (PRT) and Azure AD - Azure Active Directory | Microsoft Docs
- Windows Hello for Business Deployment Overview - Windows security | Microsoft Docs
- Configure Hybrid Azure AD joined key trust Windows Hello for Business - Windows security | Microsoft Docs
- Configure Azure AD joined devices for On-premises Single-Sign On using Windows Hello for Business - Windows security | Microsoft Docs
In this post
- Introduction
- Initial Sign-in SSO (username and password)
- WHfB based sign-in (PIN, Face ID etc)
- Pre-requisites
- Configure Azure AD Connect
- Configure the CDP
- Configure new Domain Controller certificate templates
- Configure auto enrollment for the domain controllers
- Verify CDP is accessible
- Deploying the root CA certificate to the devices
- Testing
- Troubleshooting
- Further Reading
Support My Work
I hope you find my content useful. Please consider tipping to support the running costs of hosting, licensing etc on my Ko-fi page.

