
Creating a VPN from your on-site network to Azure

If you are moving any of your local network services into Azure it's likely you don't want to have to access them over the Internet and would rather have a VPN, and "private" IP addresses assigned to each of your Azure Virtual Machines. Here I go through how to set this up using my home lab and Azure tenancy as an example.
My home network runs on 192.168.0.0/24 so I'm going to use 192.168.1.0/24 as my Azure virtual network. You'll need an on-site server which can run Routing & Remote Access - I'm just using a Server 2016 VM on my home lab. I'm 99% sure it needs to be desktop experience rather than server core.
First, open up the Azure Portal and create a new Virtual Network. I've called my virtual network "Azure" and given it the range 192.168.1.0/24. My virtual machines are then assigned private IPs from this virtual network.
Next step is to create a Virtual Network Gateway. Most of these settings can be left at default, and the VpnGw1 SKU used. More details about these SKUs is available here.
Create a new public IP address where prompted.
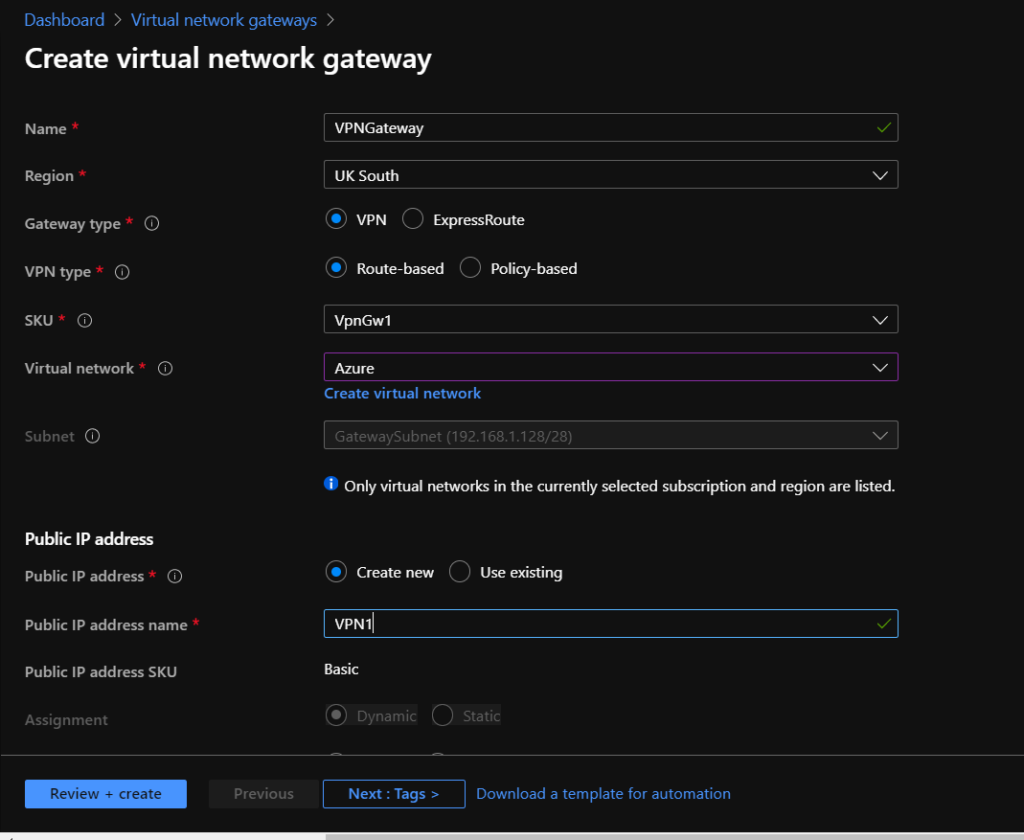
One of the options you'll see is Gateway Subnet. This doesn't get used for any of your Virtual Machines but is used by the gateway, presumably this is the subnet it would use to allocate addresses to VPN clients, if applicable.
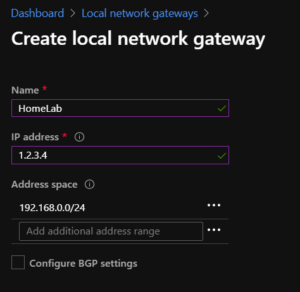
Now we need to create a Local Network Gateway:
IP Address: Public IP of your on-site server or connection (you don't need to expose any ports on the server)
Address space: your LAN address space, in my case 192.168.0.0/24
Now on your on-site server, install the Remote Access role, and tick the "DirectAccess and VPN" and "Routing" role services. Once this is installed, open the Routing and Remote Access tool. Right-click on your server name and choose Configure and Enable RRAS.
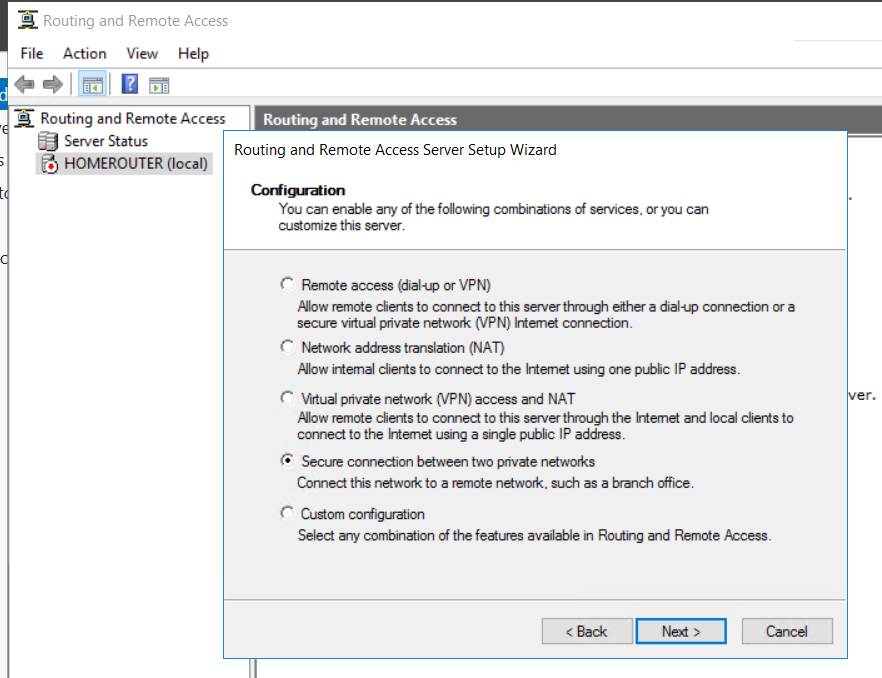
Go through the wizard, selecting Secure connection between two private networks. Say "no" to creating Demand dial connections and finish.
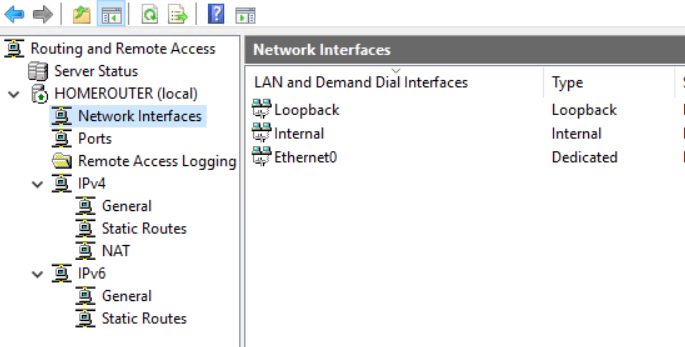
Now right-click on Network Interfaces and then click New Demand-Dial Interface. Go through the wizard:
Name: Azure
Connecting using: VPN
VPN type: IKEv2
Destination Address: the public IP address you created in Azure
Protocols and Security: Route IP packets on this interface
Static Routes: Add your Azure Virtual Network subnet here (in my case 192.168.1.0/24).
Credentials: These are not used but you can't leave them blank, so just put anything here. I just tend to put "a" in each box.
One thing to note is you can't use a static public IP in Azure for a VPN - it has to be left as dynamic.
Once you've finished that you should have a new interface appeared. Right-click on the new connection and open up the Properties, then the Security tab, and opt to use a Pre-Shared Key. Make up a long, complex key and enter it here - keep it safe to also enter into the Azure Portal a bit later on.

Now on the Options tab, select Persistent Connection to keep the VPN from dropping. Demand-dial is not really that useful any more, now that everywhere tends to have a high bandwidth, always-on Internet connection.
On your default gateway, add a static route for your Azure subnet to go via your RRAS server.
Now go back to the Azure Portal and to your Virtual Network Gateway, then Connections, then Add Connection.
Set the connection type to Site-to-Site, and pick your local network gateway, then enter your shared key from your on-site server.

Now switch back to your on-site server, right click the Azure connection and pick Connect. With any luck it'll take 4 seconds and then show Connected.
If you've not already done so, go to your virtual machines in Azure and assign them an IP address from your virtual network - on each VM go into Networking, then into the network interface, and IP configurations and set the subnet to use.
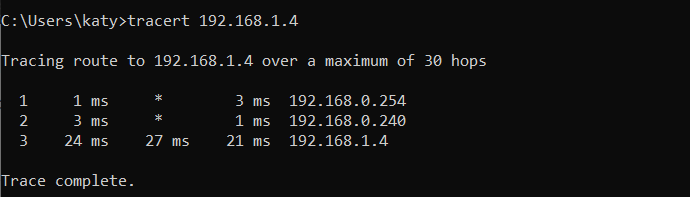
Now from a PC on your on-site network you can try pinging or a traceroute to the private IP assigned to one of your Virtual Machines (assuming they are not configured to block ICMP) and see it go via your default gateway, then your RRAS server, then arrive at the Azure VM.
My lab VPN config - 2021
I've re-created my lab recently and I'll list how I've set it up here, incase it's helpful to anyone trying this for their lab.
Lab LAN: 192.168.0.0/24
RRAS Server: 192.168.0.103
Azure: VNet: Pool: 192.168.2.0/23
Subnet for Virtual Machines: 192.168.2.0/24
Gateway Subnet: 192.168.3.0/24
Routing on RRAS server: 192.168.2.0/23 via the VPN
Routing on home lab router: 192.168.2.0/23 via 192.168.0.103
If you then put an Azure VM on the VM Subnet (192.168.2.0/24) it should be able to route back to your lab, and if you want to set up Azure Virtual Desktop, put these in the same resource group and on the same VM subnet for domain join to work.
In this post
Support My Work
I hope you find my content useful. Please consider tipping to support the running costs of hosting, licensing etc on my Ko-fi page.
