
CM: Deploying Apps from the Windows Store
There's a lot of apps in the Windows Store, and one of the best bits about them is we don't have to worry about managing their updates. Luckily we can deploy these through Config Mgr and it is fairly easy to do.
You will need a subscription which creates an Azure tenancy (e.g. Office 365) to link Config Mgr with the Microsoft Store for Business (or Microsoft Store for Education) - the Business and Education versions are pretty much the same just with different phrasing in places.
Linking Config Mgr to Windows Store
So first of all, in Configuration Manager go to Administration -> Cloud Services -> Azure Services -> Configure Azure Services. Enter a name (I chose "Windows Store") and select "Microsoft Store for Business" from the list.
On the next screen, select Azure Environment: Azure Public Cloud. Now click Browse to select the Web App, and then press Create.

Enter the Application Name (I went with "ConfigMgr"), then click on Sign In and enter your Azure global admin credentials. This should connect and populate the Tenant Name box. Click on OK.
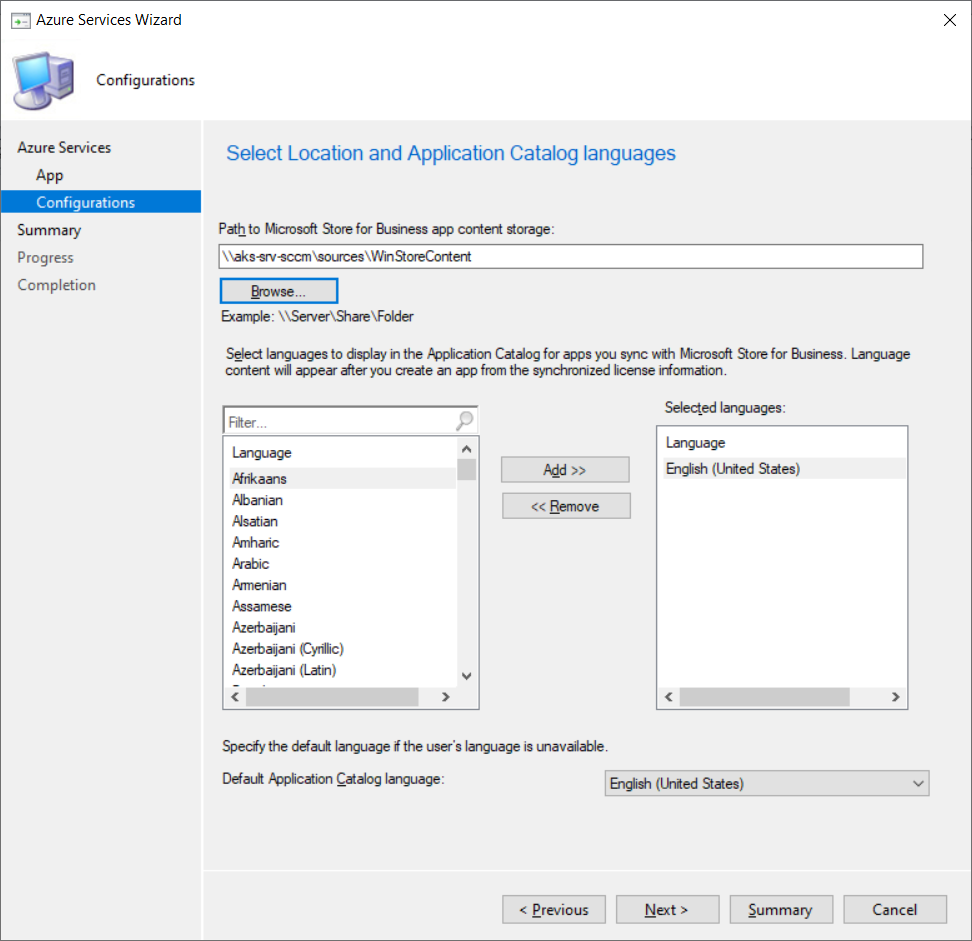
Now create a folder to store the synchronised content. I have a share called "sources" on my Config Mgr server for all the applications, drivers, scripts, OS images etc, so I've created a folder called WinStore. (Yes my server is still named SCCM, no it isn't worth renaming!). Select the languages you want, and finish the wizard.
Now we've got Config Mgr linked to the Windows Store, you'll notice it has attempted to sync and most likely failed. There's an extra step we need to take on the store to authorise ConfigMgr.
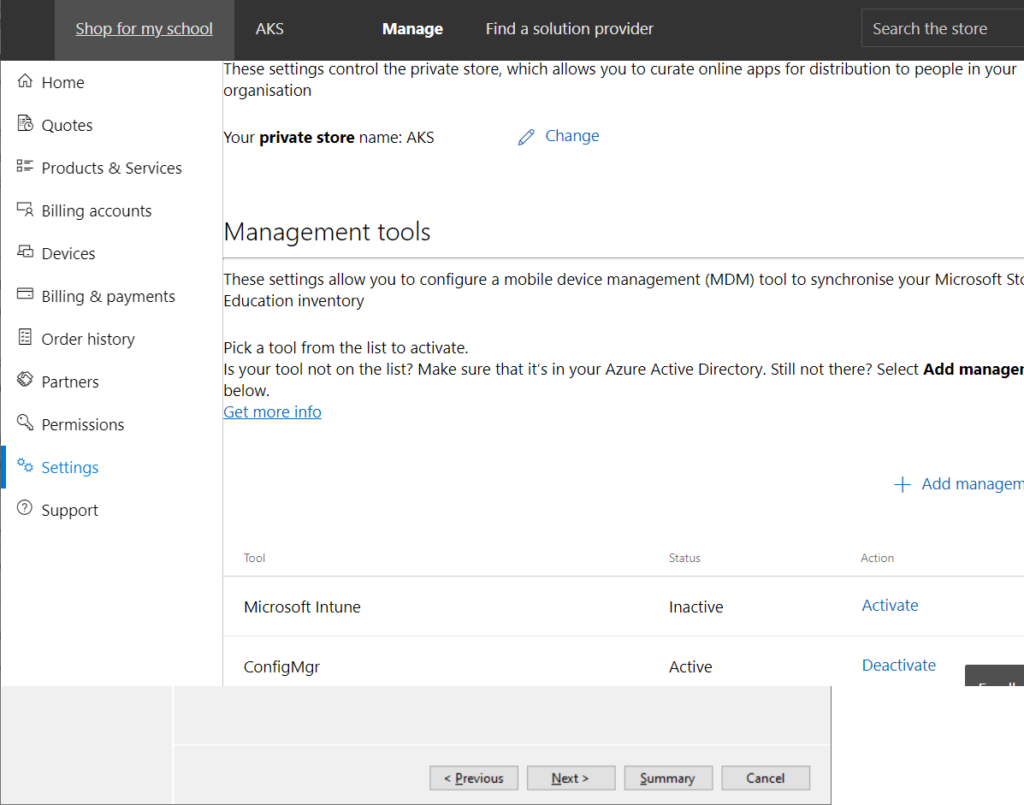
Go to the Business/Education store and log in as an account with admin rights, then go to Manage -> Settings -> Distribute. Add ConfigMgr (or whatever name you used in the first wizard) as a Management tool and click Activate.
If you've not already done so, you can set purchasing permissions etc on the Shop page. You'll need to enable Offline apps at the bottom of this page if you want to use them.
Online apps:
- Supports paid-for apps
- Install direct from the Microsoft Store
- Apps update themselves
- Device needs to be Azure AD joined or hybrid Azure AD joined
Offline apps:
- No support for paid-for apps
- Installation files stored on Config Mgr server, so no Internet connection required
- Apps can only receive updates through Config Mgr
- Device can just be on a traditional AD domain.
If you are unable to hybrid join due to your network setup (e.g. mine is one forest with many domains, each domain maps to an Azure AD tenancy) take a look at this post about getting hybrid join working without the need for an SCP.
Click on "Shop for my group/school" near the top left, browse to a free app and "buy" it.
Now in Config Mgr you should be able to sync the store. It may still show "Previous sync status: Failed" and not appear like it's doing much, but if you take a look in the path you entered during the wizard you should see some folders appearing. Just be patient for this bit.
Deploying a Store App
There's a few steps to deploying an app from the store:
Firstly you need to log on to the store with your admin credentials, and go on the "Shop for my group/school" link at the top left, find and purchase the app.
Next step is to synchronise the Windows Store for Business in Config Mgr. This happens periodically or you can manually force a sync.
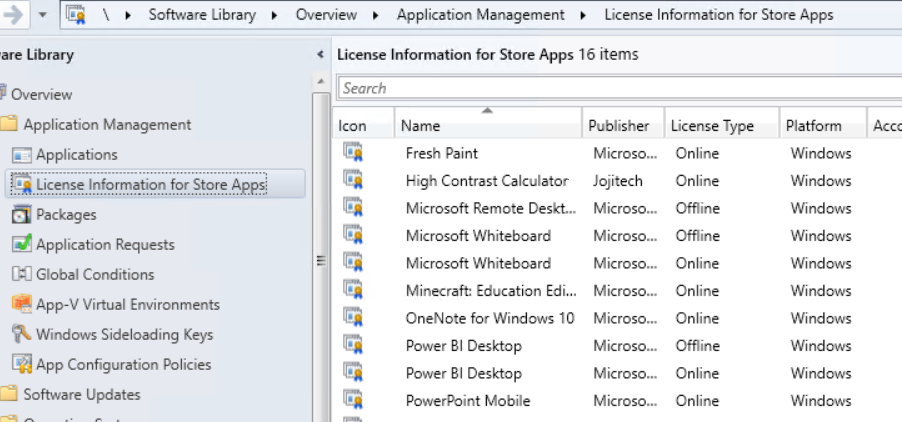
Next go to "Software Library\Application Management\Licence information for Store Apps", right click on the app you want to distribute and pick Create Application. Follow through the wizard and once done, go to Applications.
Find the application, right click and Deploy. Now go through the deployment wizard as usual, picking your device collection. You don't need to specify a distribution point if you've gone with an online app.
As usual you can check up on the installation status through the Monitoring section. It can be a little misleading with Store apps - when I was testing it claimed the app was installed on a device but, because it was an online app and a non-AzureAD joined device, it wasn't anywhere to be found when I logged on.
In this post
Support My Work
I hope you find my content useful. Please consider tipping to support the running costs of hosting, licensing etc on my Ko-fi page.
