
Intune: Managing iOS devices
In this part of the Intune series of posts I'm looking at getting iPads enrolled and managed, and deploying apps. In my case I'm looking to migrate some iPads from an existing MDM into Intune, so I'm assuming you already have an Apple ID set up to create the push certificates and already have Apple School Manager (or Business Manager) set up.
Configuring all the certificates and tokens
So our first step is to configure the push certificate - this is used by Apple to push settings from Intune to the devices. Go to Devices > iOS/iPadOS enrollment and click on Apple MDM Push Certificate. Follow through the steps - download a CSR, create and download the push certificate at https://identity.apple.com/pushcert/, then upload this back in Intune where prompted. These certificates only last a year so you'll need to set a reminder to update this annually.
Next step is the Enrollment Program Token. Go to Devices > iOS/iPadOS and click on Enrollment program tokens. Click on Add and follow through the steps: Download your public key, head over to Apple School Manager (or Business Manager). Go to Settings, then Device Management Settings and click on Add MDM server.

Run through the steps and upload the public key you downloaded from Intune where prompted. Eventually you'll reach a step where you can download a server token - go ahead with this and then upload this token into Intune.
Now if you already have devices enrolled in Apple School Manager you'll need to unassign them from your old MDM and assign them to Intune. To do this, go to Devices, pick the device you want to use for testing, then click on Edit Device Management. Change the MDM server to Intune. You can select multiple devices by holding Shift and clicking (for large ranges) or control and click to pick multiple individual devices.
Once you've assigned some devices, you should be able to go to Devices > iOS/iPadOS > Enrollment program tokens and pick the token you just added. Click on Devices and then if you press Sync it should perform a sync with Apple and eventually show your devices.
The final step is setting up the VPP Token. This is used for deploying apps to the devices. Go to Tenant Administration > Connectors and tokens > Apple VPP Tokens and click on Create. Back in Apple School Manager, you'll need to set up a location if you haven't already got one - under Locations at the top of the left hand menu. Once you've made a location (it may take a few minutes for this next bit to appear, at least it did when I made a second location for testing purposes) go to Settings > Apps and Books and scroll down to the bottom where you should see My Server Tokens. Download the token for the location you want to use. Upload this into the Intune settings page we were just on and finish the steps.
Applying device profiles
Go to Devices > Enroll Devices > Apple enrollment, click on Enrolment Program Tokens and then click on your token. Click on Profiles and then Create profile. Follow through the steps to create your profile - this will include things like whether you want the devices to be Supervised (I always say Yes for this), and which screens you want to skip when the device runs its initial setup routine. I tend to hide all of them except Location Services - this is needed for the device to determine its time zone and cannot (yet) be controlled by the MDM.
Once you've created your profile, you can click on Assign devices to assign this profile to your devices. You can then do a factory reset/"Erase all content and settings" on the device and it should start its initial setup routine and tell you that you have to install a configuration profile. You need to have reset an iPad and let it apply the device profile before it appears in Devices > iOS/iPadOS.
Device configuration profiles
Next step is to apply any configuration profiles - optional step really but I use this to push out device restrictions, the enterprise root CA certificate and the wireless network settings. These can be found under Devices > iOS/iPadOS > Configuration profiles and as usual you'll be assigning them to either a device group or All devices.
Click on Create profile and to get started and you can choose from a selection of profile types - the main ones I'm interested in are Device restrictions, Trusted certificate and Wi-fi.
Purchasing and deploying apps
Before I go through purchasing apps, it's useful to create an Azure AD group for the devices to make targeting deployments easier. In this case I've gone into the properties for the iPads (Devices > iOS/iPadOS) and set the Device Category of each to iPads - Staff. I've then created a dynamic group in Azure AD where the dynamic membership rule is (device.deviceCategory -eq "iPads - Staff"). An alternative rule, if you just want to target every iPad or iPhone, would be (device.deviceOSType -contains "iPhone") -or (device.deviceOSType -contains "iPad").
There are two ways to deploy apps to your devices - both happen in the Apps > iOS/iPadOS screen.
- Store apps: You can deploy free apps from the App Store by clicking on Add and following the instructions, however the devices will need to be signed in with an Apple ID for it to download and install the apps.
- VPP Purchased App: Apps purchased through the volume purchase program, i.e. within Apple School Manager. These can be pushed to the device without requiring an Apple ID or any end user user interaction.
I'm going to be using VPP apps as I don't want shared devices to have Apple IDs attached. Go to Apple School Manager > Apps and Books and "purchase" the apps you require - you need to go through the same routine even for the free apps. If you've already got apps purchased, but have set up a second location for testing, you'll need to re-purchase the apps for the second location (or transfer them).
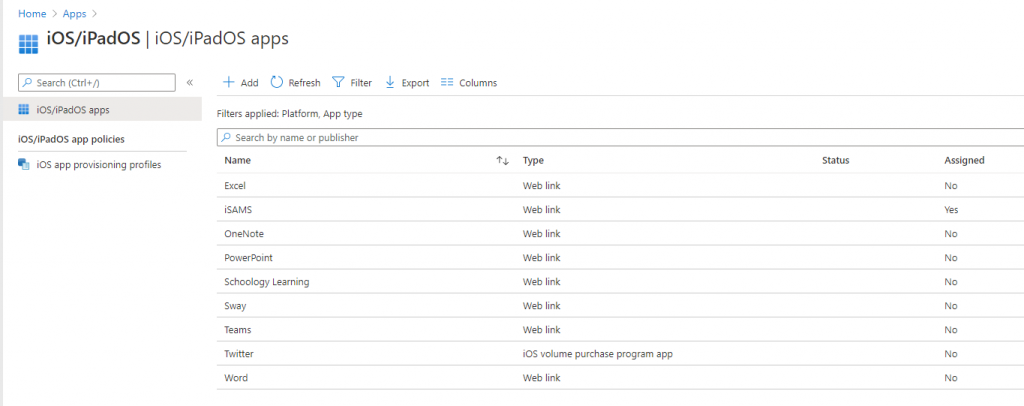
Once you've purchased the apps you want (or transferred them from an alternative location), go to Tenant Administration > Connectors and tokens > Apple VPP Tokens and click on the "3 dots" menu at the right hand side of your VPP token, then click on Sync. If you then go back to Apps > iOS/iPadOS you should see the apps you "purchased" through VPP - in this case, Twitter:
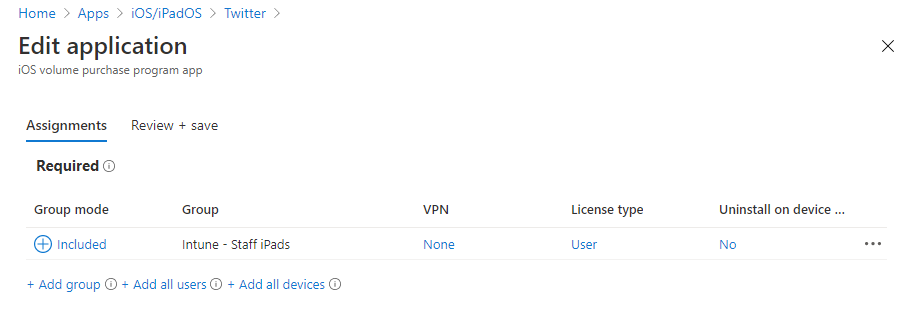
To deploy the app, click on it, then go to Properties, scroll down and Edit the Assignments. This is the usual Intune assignment screen so I'm going to set this as Required for all devices in the Intune - Staff iPads group. As an additional step, once you've done this you then need to change the License type to device. Click on User and alter the settings to use device licensing. You can also control whether the app is uninstalled when the device is no longer managed by Intune.
As with the Windows devices on Autopilot, iPads can be forced to sync through Devices > iOS/iPadOS and clicking on the relevant device, then click Sync.
Further Reading
In this post
- Introduction
- Configuring all the certificates and tokens
- Applying device profiles
- Device configuration profiles
- Purchasing and deploying apps
- Further Reading
Support My Work
I hope you find my content useful. Please consider tipping to support the running costs of hosting, licensing etc on my Ko-fi page.
