Project: Certificate Expiry Notification Tool
I've always hated having to set calendar reminders whenever an SSL certificate or Azure AD App Registration certificate expired. What if you forget to set the reminder? What if you're off sick and miss it? In most cases missing it means disruption of service for a while, but in some cases - for example some of the Apple certificates/tokens used when managing Apple devices in Intune - missing the renewal means you need to re-enroll all your devices. If you've restricted profile removal then you'll have to factory reset them all too.
I had an idea a while ago for a system to track these, and send reminders, and recently I've been working on a system to do just this. There's many different ways I could have gone about this - PowerShell script, or maybe something in PowerApps/Flow, but I wanted a nice web interface, and my weapon of choice for web development is PHP.
This project will show you a list of certificates and secrets, along with their expiry date and a status indicator (Expired/Warning/Okay). It will automatically pull any Azure AD App Registrations secrets and certificates, and the Intune Apple VPP tokens, Push Notification and Enrollment Program tokens from the Microsoft Graph API. Email alerts can be configured, which will also use the Graph API to send the mail.
Getting Started
First of all you will need a web server to install the project. I've tested it with Apache on Linux, and IIS on Windows Server 2019. You will need PHP 7 and the curl extensions installed on the server, and you'll need either MySQL server or MariaDB. You'll also need an Azure AD account with a mailbox which can be used to send out the e-mail alerts. This account does not need any privileges, just its own mailbox.
Next you'll need to make a directory for the code, and then clone it:
git clone https://github.com/CoasterKaty/CertExpiry.git
Or alternatively download it from the GitHub repository.
This will give you a directory structure containing two folders: inc and www. You will need to configure the root of the website to be the www folder, so in Apache you'd set DocumentRoot /path/to/CertExpiry/www, in IIS this is within the Basic Settings for the site. The inc directory should not be accessible from the website.
Create a new database on your MySQL/MariaDB server, and then run the contents of the database.sql file to create the tables and set up the initial data. Set up a user account for this database, it will need SELECT, INSERT, UPDATE and DELETE privileges on this new database.
Now we need to set up the configuration file. Make a copy of inc/_config.inc called inc/config.inc and edit it in a text editor. Fill out the database fields, and the _URL field. This should be the URL to your website, with no trailing slash - this is used when communicating with Azure AD logon servers.
define('_MYSQL_HOST', 'Hostname of the MySQL server here');
define('_MYSQL_USER', 'Username you created for the database');
define('_MYSQL_DB', 'Name of the new database');
define('_MYSQL_PASS', 'Password for the database user');

define('_URL', 'https://domain.used.by.this.website');
Next we need to create the Azure AD App Registration. Go to the Azure AD > App Registrations page and create a new registration. Enter the name of the app (this is displayed on the logon page, can be anything you like), and select Single tenant as the supported account type. (In a future version I hope to add multi-tenant support). Fill in the redirect URI with the domain you are using for this site, followed by 'oauth.php', e.g. https://certexpiry.katystech.blog/oauth.php and click Register. This domain must match the value entered earlier in the _URL field.
We can now fill out a bit more of our config.inc file, using the Application ID and Directory ID displayed on the App Registration page.
define('_OAUTH_TENANTID', 'The Directory ID from the App Reg screen');
define('_OAUTH_CLIENTID', 'The Application ID from the App Reg screen');
We also need to set up how the application will authenticate itself to Graph. There are two options here:
- Client Secret: A complex text password. Easiest to set up but least secure
- Client Certificate: A public/private key pair, harder to set up but most secure.
If you want to use a client secret, go to the Certificates & Secrets page in the App Registration, and add a new client secret. Copy the value (not the ID) of this, and go back to config.inc:
define('_OAUTH_METHOD', 'secret');
define('_OAUTH_SECRET', 'client secret value');
If you want to use a client certificate, you will need to go through the process to obtain a certificate (generate CSR, submit to a certificate authority etc). Basically you will need the private key and the certificate itself in Base64 form, saved onto the server file system - I tend to put these one level up from the directory git created for us. Then in config.inc:
define('_OAUTH_METHOD', 'certificate');
define('_OAUTH_AUTH_CERTFILE', '/path/to/certificate.crt');
define('_OAUTH_AUTH_KEYFILE', '/path/to/privatekey.pem');
Now in Azure AD > App Registration , go to Certificates & Secrets, then Certificates, then upload the certificate.
Next we need to grant permissions for the application to access various bits of the Graph API. From the Azure AD > App Registration, click on API permissions, then Add a permission. Click Microsoft Graph, then Application permissions and add the following:
- Application.Read.All - required to read the App Registrations
- DeviceManagementServiceConfig.Read.All - required to read the Intune certificates
- Directory.Read.All - required along with Application.Read.All for the app registration support
- Mail.ReadWrite - required to send mail
- Mail.Send - required to send mail
You'll then need to grant admin content to turn these permissions on.
The Mail.ReadWrite and Mail.Send permissions that have been granted give the application permission to read/write and send from any mailbox in the tenant - so next step is to restrict this to just the mailbox you want to use for sending alerts. In PowerShell:
Connect-EXOPSSession
New-ApplicationAccessPolicy -AppId (application ID) -PolicyScopeGroupId [email protected] -AccessRight RestrictAccess
Finally we need to restrict who can access this application. Go to Azure AD > Enterprise Applications and find your app. Go to the Properties page and toggle Assignment required to Yes. Next go to the Users and groups page and add the users/groups you wish to have access to the application.
Loading the App
Now that everything is set up, you should be able to go to the site in a browser. I use Edge as my primary browser so this has been fully tested with Edge, I've done a bit of testing with Firefox which seems to work too. Other browsers may vary. You should be directed to log in, using an account which you have added in the previous step, and be taken to the list of certificates and secrets.
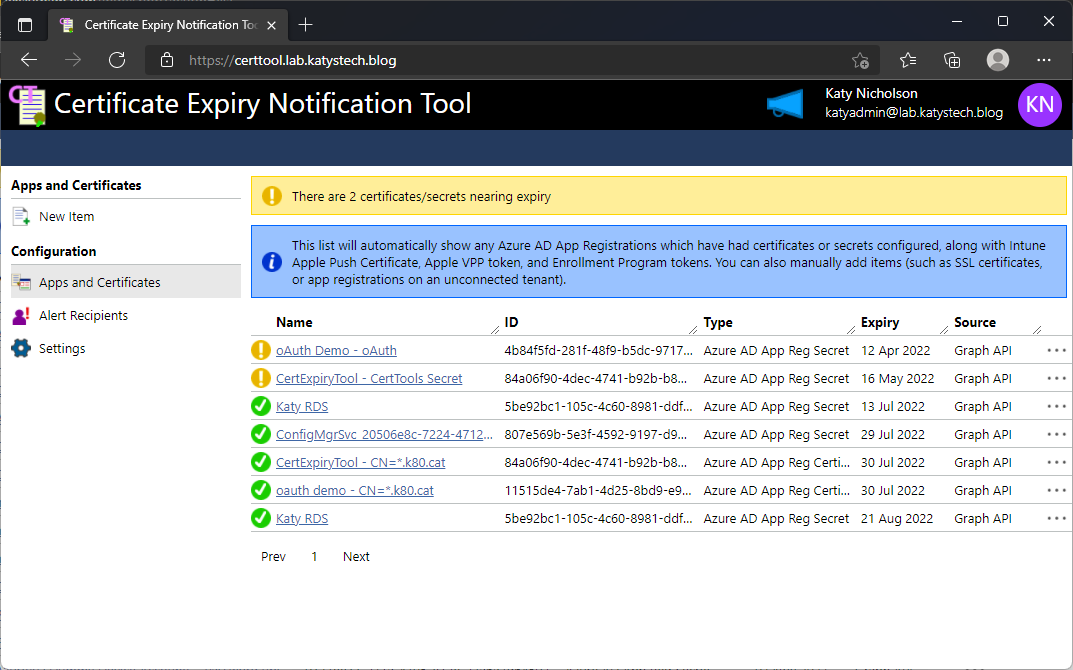
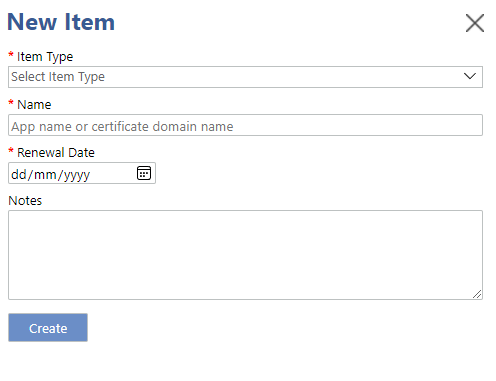
You should now see any App Registration secrets and certificates you have in Azure AD. You can add other items to the system by clicking on New Item and filling out the form. These can be SSL certificates, App Registration secrets or certificates on other tenants, domain names, or anything really.
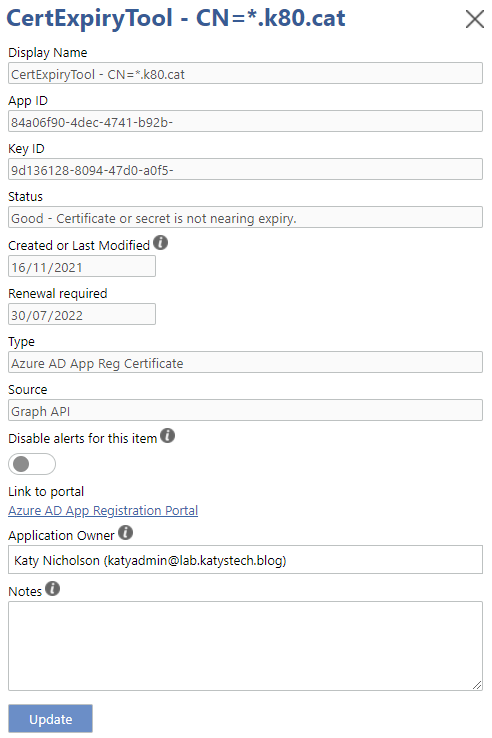
Clicking on any of the items in the list will open their properties screen. Here you can add any notes that you wish, and you can also mute email notifications for specific items. The notes are saved locally in the database - nothing here is written back to Azure AD. The list of owners is taken from the Azure AD App Registration > Owners page.
If you don't want to use e-mail alerts then that's pretty much it - the list is sorted by expiry date, and you can configure the threshold for determining what is expiring soon, and how many items you see per page in the Settings menu.
If you do want to use the e-mail alerts feature, you will need to click on Alert Recipients and add at least one recipient e-mail address. Next, you will need to click on Settings and enter the sender e-mail address (so, the address of the mailbox used for sending the alerts), and toggle the alerts on. You can also set the frequency of the e-mails here - if you set this daily, alerts are checked for and notified daily. Weekly - this will run once every 7 days, and so on.
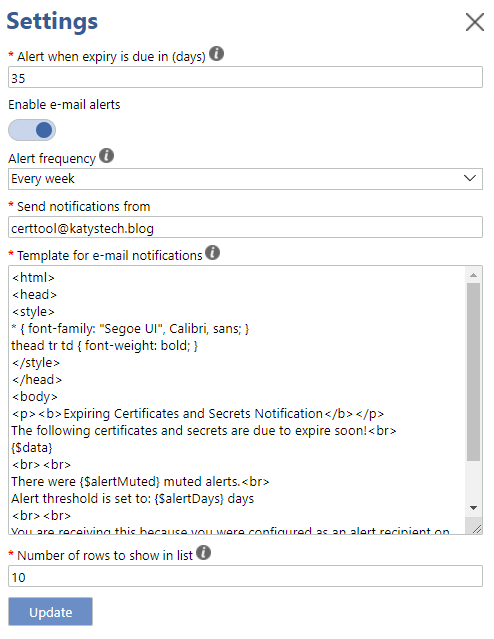
The content of the alert emails can be configured here too. It currently needs to be HTML formatted, as the table of items is HTML based. You can include the following variables:
- {$alertMuted} - the number of muted items which would have been in the alert if not muted
- {$alertDays} - number of days before expiry that the warning occurs
- {$data} - the table of alerts
- {$url} - the URL to the website
Setting up the alert script
The last step here is to set up the script which sends the e-mail alerts. On linux this would mean adding a section to cron or similar, on Windows a scheduled task. Set this to run once per day at whatever time suits best. The linux command is:
php /path/to/CertExpiry/inc/alert_mail_task.php
and for Windows:
C:\Path\to\php.exe c:\path\to\CertExpiry\inc\alert_mail_task.php
Bugs, feature requests, feedback
There is a button near the top right for bugs and feature requests, which takes you to the GitHub repository's issues page. I am planning the following features in a future version:
- Multi-tenant support
- Calendar integration (ICS file)
- Audit logging of actions
- Grouping of items - to target specific alert recipients with specific items only
If you find the login session times out too soon, you will need to edit a few parameters in php.ini:
- session.cookie_lifetime - set to 0 by default, sessions last until the browser is closed
- session.gc_maxlifetime - set to 1440 (24 minutes) by default - number of seconds until session data is seen as stale and removed.
In this post
- Introduction
- Getting Started
- Loading the App
- Setting up the alert script
- Bugs, feature requests, feedback
Support My Work
I hope you find my content useful. Please consider tipping to support the running costs of hosting, licensing etc on my Ko-fi page.

