Removing Teams Chat from Windows 11
As you've probably already noticed, Windows 11 comes with a Teams client baked in. It's the shiny new Edge WebView2 client! Hooray no more Electron! Unfortunately it only supports personal accounts at the moment - so it's anything from a nuisance to added confusion on any sort of managed desktop. Luckily there are a few ways to get rid of it and I'll run through them here. It doesn't matter if you're on-prem, hybrid or pure Azure AD as there's a GPO setting and Intune policy setting to achieve this, as well as a Policy CSP/OMA URI if you want to use that instead.
Firstly we can remove the app using the following PowerShell - perhaps as part of a task sequence if you are deploying the OS using ConfigMgr. This would need to run before anyone has logged on (as it doesn't make any change to existing user profiles).
Get-AppxProvisionedPackage -Online | Where {$_.DisplayName -eq "MicrosoftTeams"} | Remove-AppxProvisionedPackage -Online
If you've already got a script which removes various AppX packages you can simply add MicrosoftTeams to the list, if you haven't - the above PowerShell is how to do it. This removes Teams from the Start menu and apps search, but doesn't remove the task bar button - you will also need to remove the icon using GPO/MEM/Registry settings.
Removing the Icon - Group Policy
First you'll need to make sure you are using the latest ADMX templates, to include the new Windows 11 settings. I won't go into full detail here but stick them in C:\Windows\PolicyDefinitions on your domain controllers, or (preferably) in your central store if you have one.
The setting we need is: Computer Configuration\Administrative Templates\Windows Components\Chat\Configure the chat icon on the taskbar
We can configure this one of three ways:
- Show: Obviously, keeps the icon on the taskbar. Users can turn this off in Taskbar Settings if they wish.
- Hide: Hides the icon on the taskbar, but users can turn this back on in Taskbar Settings.
- Disabled: Hides the icon on the taskbar, and users cannot turn it back on.
Important to note here is that these settings only work on the first sign-in attempt, apart from Disabled which works on all sign-ins.
Removing the Icon - MEM/Intune
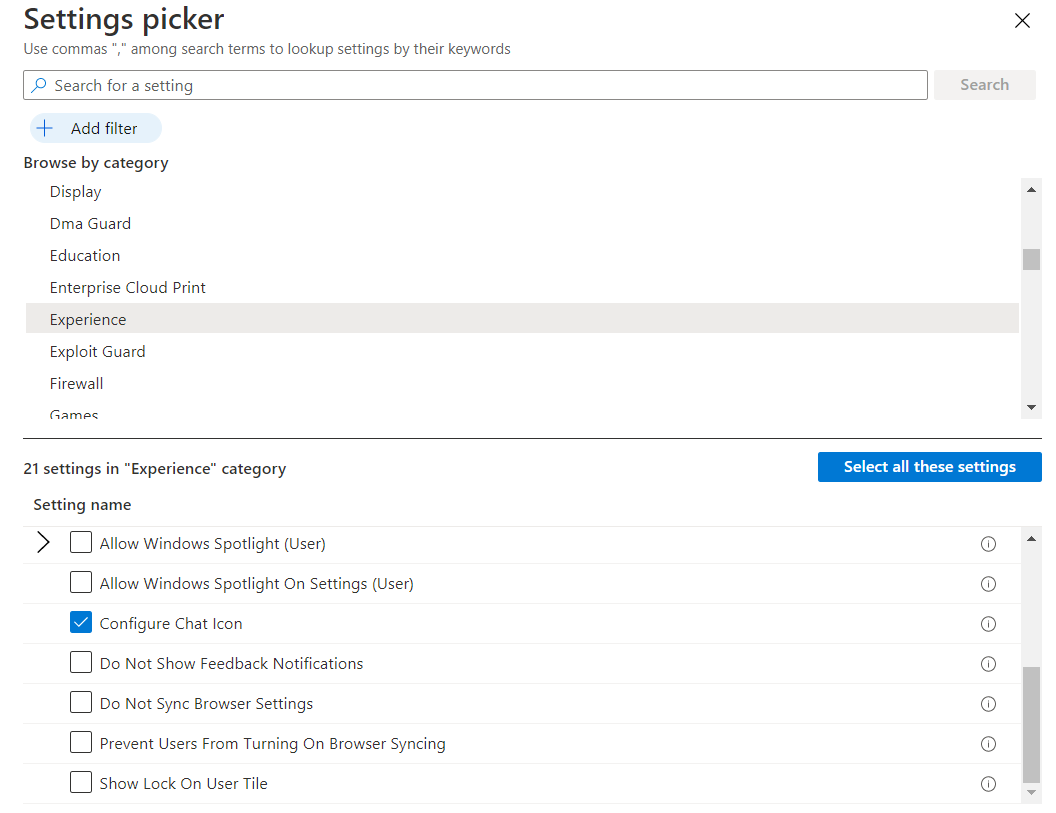
We can remove the icon in MEM in a similar way to the Group Policy method. Open the MEM portal and go to Devices > Configuration Profiles. Create a new profile and select Windows 10 and later, and Settings catalog. Browse through the Experience category and find Configure Chat Icon. Tick that to add it to your profile, then close the Settings picker.

As with the GPO method, our options are Show, Hide or Disabled - make your choice, fill out the standard Assignment screen, and complete the profile setup.
Finally this setting could be controlled using Policy CSP, with the OMA-URI ./Device/Vendor/MSFT/Policy/Config/Experience/ConfigureChatIcon. The possible settings here are:
- 0: Not configured
- 1: Show
- 2: Hide
- 3: Disabled
Registry Setting
Finally we can set this with a registry setting if we really want to (although I'd always recommend using a managed way of changing this - i.e. the GPO or MEM setting - as these keep up to date with any possible registry location changes in the future.
HKLM\SOFTWARE\Policies\Microsoft\Windows\Windows Chat\ChatIcon (DWORD). Values are as above - 0: not set, 1: show, 2: hide, 3: disabled.
You can test this has worked by killing and then re-launching explorer.exe.
Further Reading
Policy CSP - Experience - Windows Client Management | Microsoft Docs
In this post
- Introduction
- Removing the Icon - Group Policy
- Removing the Icon - MEM/Intune
- Registry Setting
- Further Reading
Support My Work
I hope you find my content useful. Please consider tipping to support the running costs of hosting, licensing etc on my Ko-fi page.

