WAC: Hyperconverged Hyper-V Cluster with S2D
Last year I replaced a 3 node VMWare+SAN cluster with a 2 node hyperconverged Hyper-V cluster. I've been quite impressed with it so far so thought I'd write how I did it - especially considering I did the bulk of the work through Windows Admin Centre.
Before you decide to sit down and do this, be warned it's not a quick process. If you're in any doubt you should probably consult a vendor who has the Microsoft certified hardware and expertise available before putting this into production - if you're fine with setting up complicated things yourself, or it's for testing, then you're welcome to come along for the ride. You'll no doubt waste countless hours trying to get Windows to play with the disk adapters and get the disks into the right mode for S2D, especially if you're using older hardware, so I'd set aside at least a full day or two.
The hardware I've used for this is as follows:
- 2 identical host servers with plenty of RAM and decent CPUs.
- At least 5 physical disks per host - 1 for the OS, at least 4 for data. If you're not using SSD for every drive I'd add in at least 2 SSD for Storage Spaces Direct to use as cache.
- Disk controller that is compatible with Storage Spaces Direct. Basically it has to be directly attached and on a controller that supports simple pass-through mode - this rules out some older controllers like the P410i in a lot of the 6th generation HPE kit (it doesn't have a pass-through mode). There's a full list of requirements here.
- At least 3 x 10GbE connections per host. We use two of these for storage operations, giving the cluster a combined 20GbE if it needs it for replicating data from one host to the other, and the third connection to connect the Virtual Machines to the network.
- If you have more than 2 hosts, a suitable 10GbE switch for the storage networking.
- At least 1 x 1GbE connection per host.
- Optionally, the iLO or BMC network connection, so I can manage the server and access the console remotely if there's a problem with Windows.
- An existing Active Directory domain, or alternatively a new one just for the cluster to use.
- An existing Windows Admin Centre installation. Preferably on the same domain as the host servers to avoid all sorts of WinRM and credential delegation issues.
- Windows Server Datacentre Edition is required to use Storage Spaces Direct.
Preparing the host servers
The network configuration on each host should be as follows:
- Storage Adapter 1 - 10GbE - link this with a direct attach cable to Storage Adapter 1 on the other host. If you have more than 2 hosts you'd need to connect this to a 10GbE switch.
- Storage Adapter 2- 10GbE - again link with a direct attach cable to Storage Adapter 2 on the other host, or into the 10GbE switch.
- Compute Adapter - 10GbE - this is the network uplink for your virtual machines, so connect to your network infrastructure. If you make use of VLANs this should be a trunk port.
- Management Adapter - 1GbE - this is used for management tasks so low bandwidth. Connect to your network infrastructure - this shouldn't be a trunk port
- iLO/BMC adapter - optional - connect to your network infrastructure, this adapter is not visible from within Windows and needs configuring on the server BIOS separately.
Install Windows Server 2019 Datacentre Edition onto the hosts - it doesn't really matter if it's the core or the desktop experience as it'll work on both, I'd prefer core as it means less unnecessary stuff running on your hypervisors. Install onto the first disk, leaving the 4 data disks untouched.
Once Windows is installed, we'll need to add the File Server role in order to use Storage Spaces Direct properly - so do this either through Server Manager or PowerShell: Install-WindowsFeature -Name FS-FileServer
We also need to configure the IP address, DNS server, remote desktop settings, computer name and domain name. You can do this using any tool you're familiar with, I tend to use sconfig which is a menu driven command interface and probably the easiest choice if you've gone with a core install.
I've given the Management network interface the IP addresses 172.26.88.10 (Host 1) and 172.26.88.11 (Host 2), both /24, and set the DNS server to point to the domain controller. At this stage I'd also disable any extra network adapters that are not going to be used.
As usual you'll be forced to restart for the domain join to take effect.
Creating the cluster
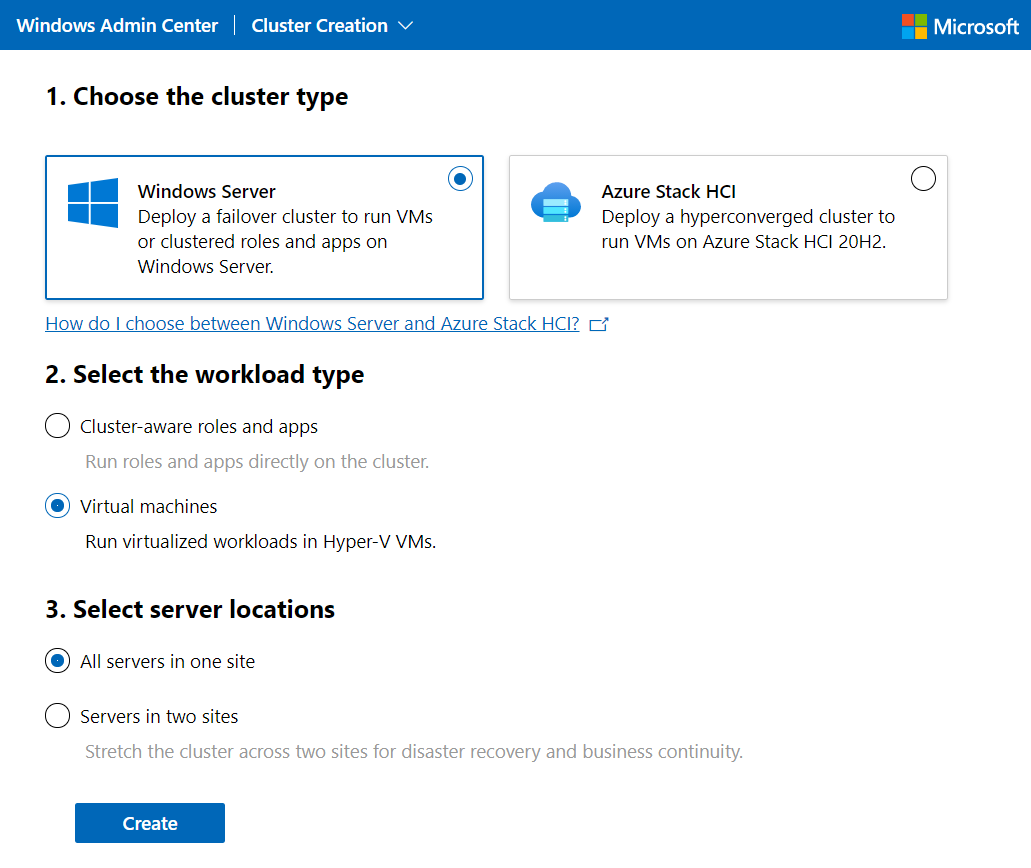
One you've completed that, on WAC click on Add, then create a new cluster. Select Windows Server as the cluster type, Virtual Machines as the workload type, and in this case I'm going with all servers in one site.
Now we'll see a list of prerequisites and a list of 6 steps the wizard is going to guide us through. We should have covered all the prerequisites already - two or more servers with supported hardware, network adapters for management, storage, compute, Windows Server 2016 or newer and administrator rights, along with an AD domain and VLAN configuration, if applicable.
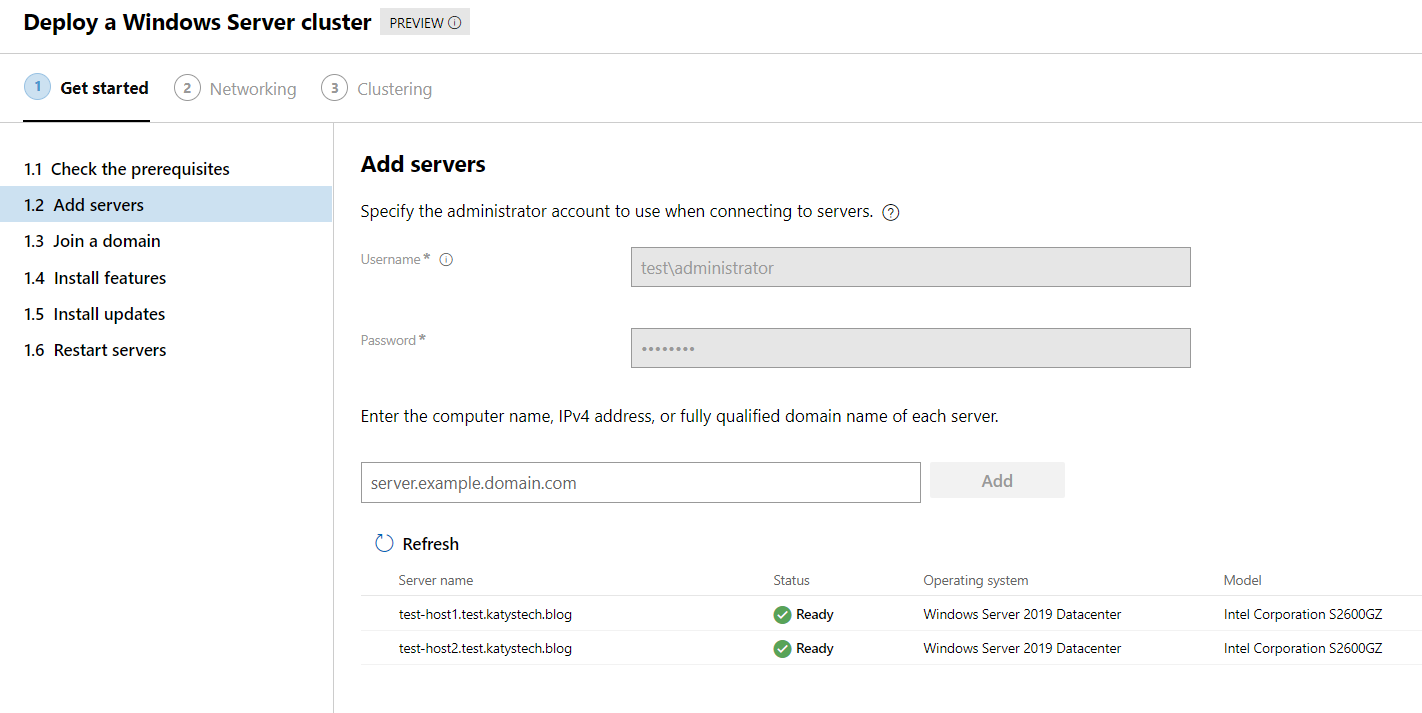
The next screen will ask us for credentials and server names to add the servers. Enter an administrator account and add your servers. It might take a while before it validates the servers but this is normal.
The next step will ask you to join them to a domain - as they are already on a domain it should show as Ready and let you click Next. If for some reason you didn't join them yet, enter the details here. Once you've got the status to show Ready, click Next.

Now we'll get a screen showing us the required features and their installation status on each server. Click Install features to get going. Once it's all installed you should see lots of green ticks and the Next button will enable. Click it and move on to updates.
Updates are optional but I'd recommend installing them. In my case this lab environment has no Internet access so this step's not possible, in my production environment I let it put the updates on. So wait for it to update, or just click Next to skip.
Finally we arrive at the server reboot step! Click the button to restart your host servers. They restart a couple of times whilst configuring the roles and features so it may take a while if you have servers that spend ages thinking about things pre-boot.
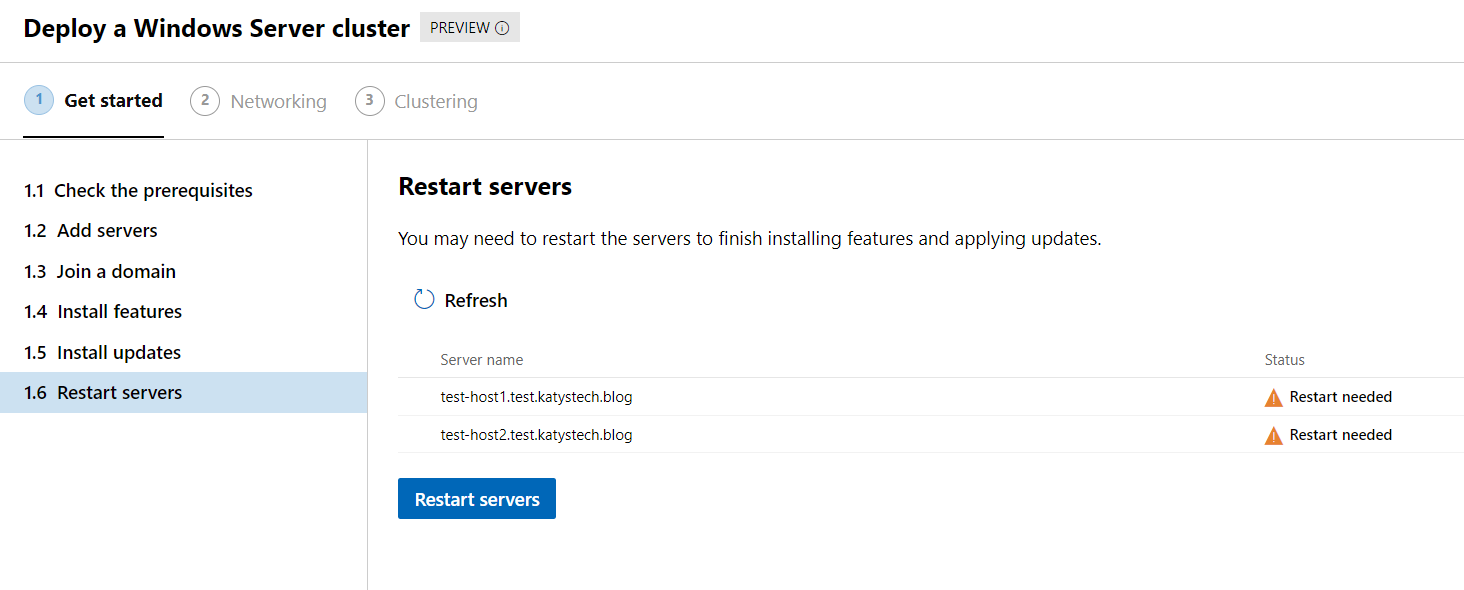
Once they've restarted and finished booting you should see the status change to Ready and the Next: Networking button should enable at the bottom. Click on the button for the next step.
The wizard will now check the network adapters on each host - make sure they're all looking good as below. (In this test environment I've dropped a 10GbE network uplink for the Compute connection to 1GbE as I've not got enough spare 10GbE cards)

The next screen is selecting which network adapter to use for management, and whether you want a single adapter or two adapters teamed. Pick the appropriate option (single adapter in my case) and then select the management adapter on each host, and click Apply and test, then Next.
Now we need to name the network adapters and set the IP configuration. I've used the following naming scheme and assigned them the following IP addresses:
- Storage1: Host 1: 172.26.89.1, Host 2: 172.26.89.2 (/24)
- Storage2: Host 1: 172.26.90.1, Host 2: 172.26.90.2 (/24)
- Compute: Host 1: 172.26.88.12, Host 2: 172.26.88.13 (/24)
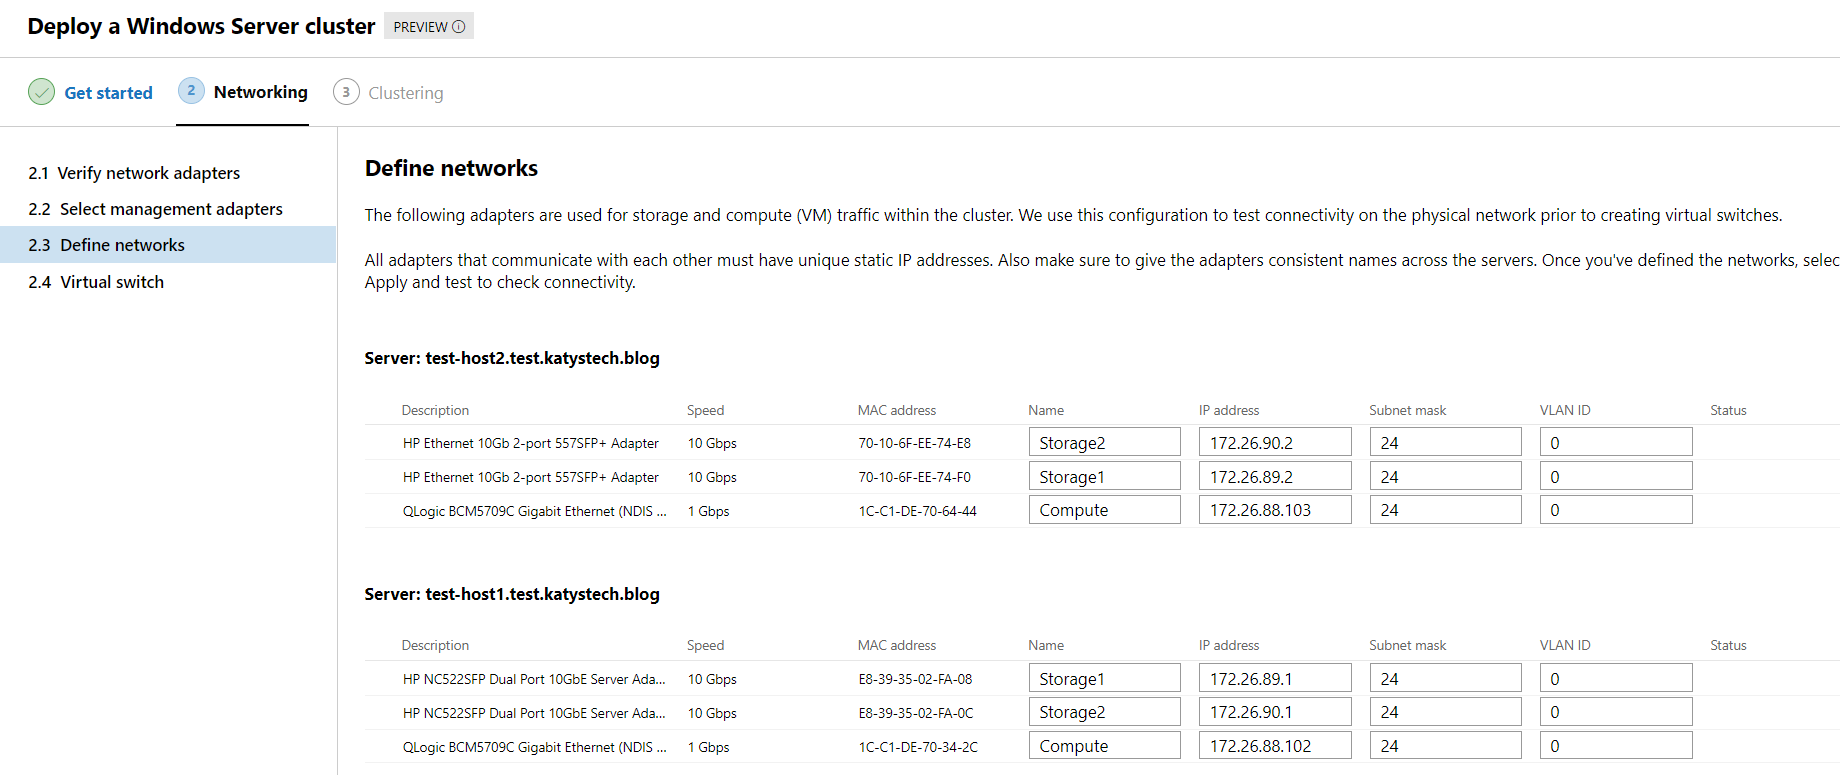
Once it's applied any changes and tested things, click on Next.
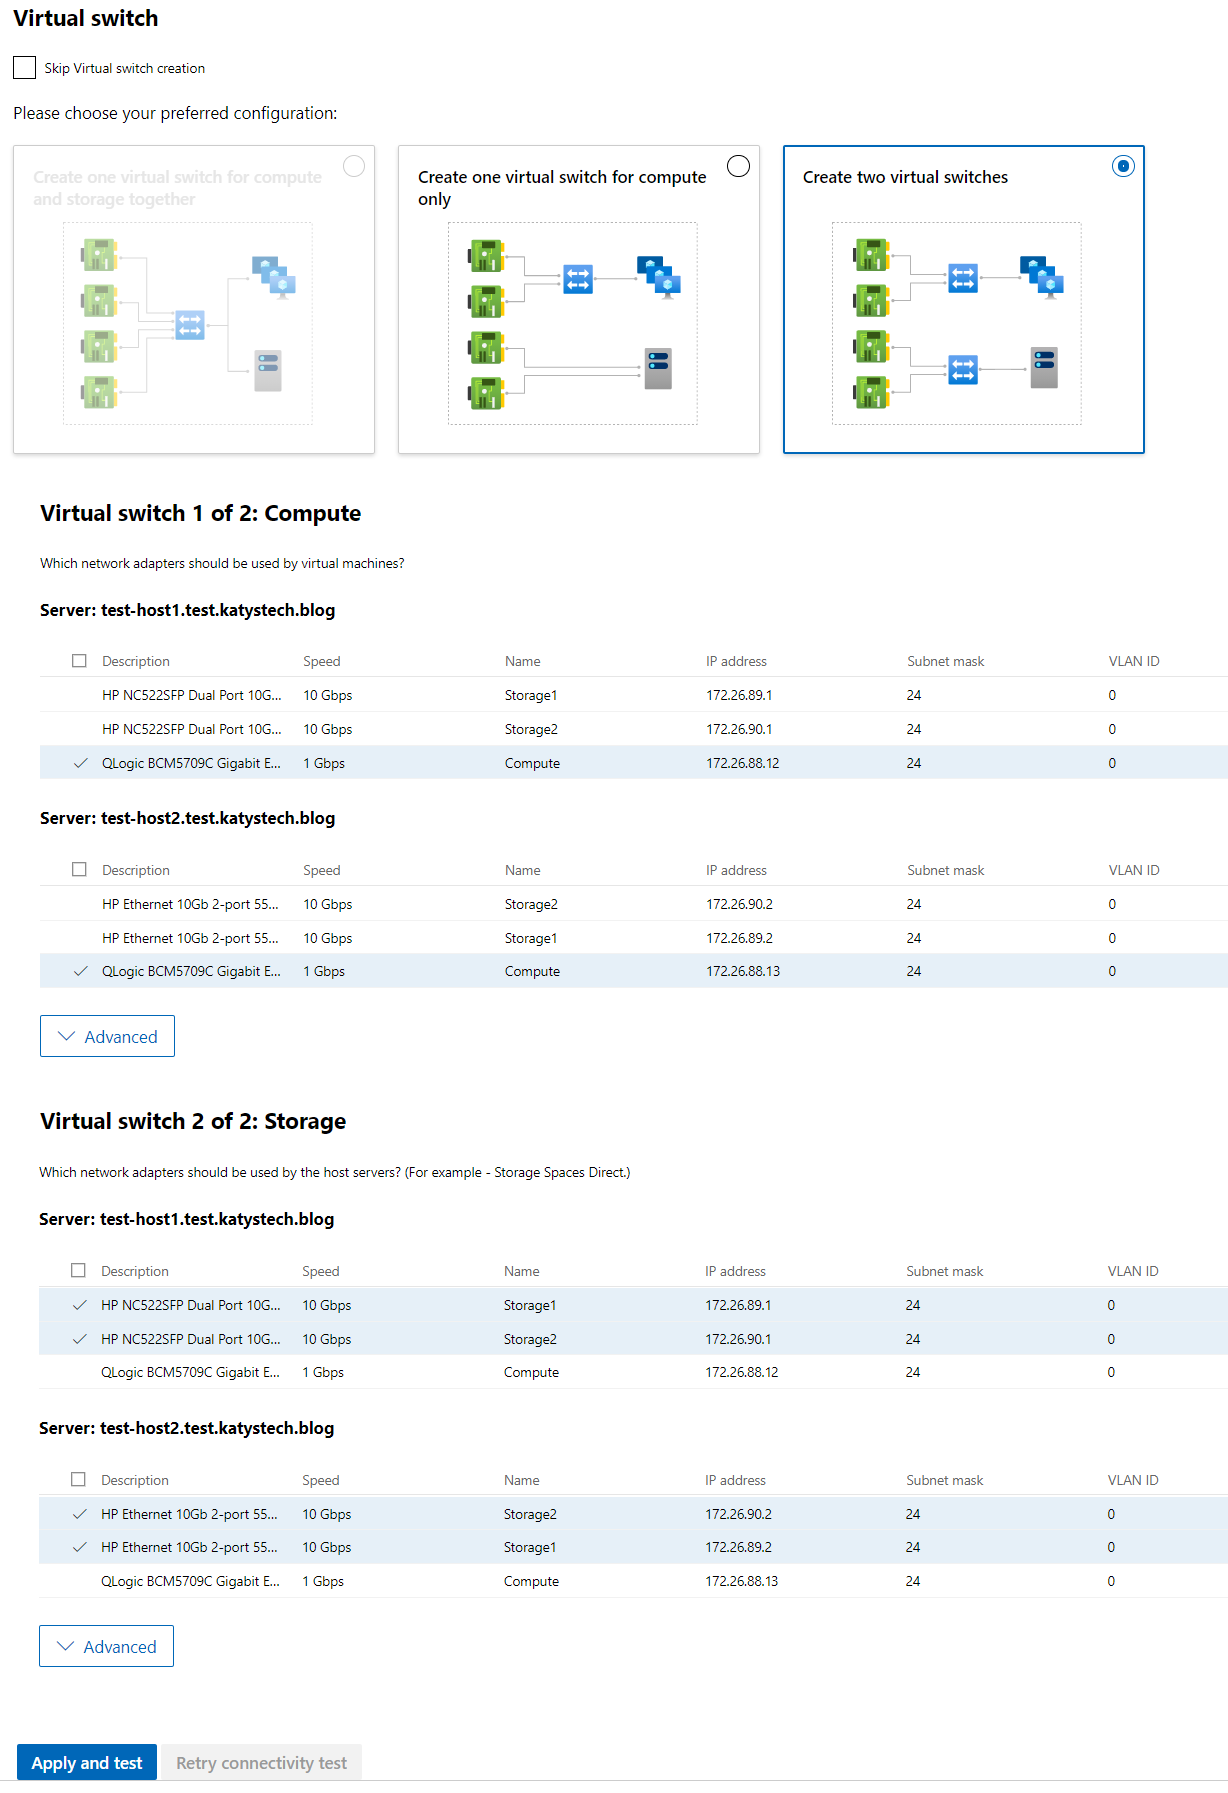
Now we need to define the Virtual Switches. In this configuration I use two switches - one for compute (i.e. the switch the Virtual Machines will use to talk to the network) and one for storage (i.e. for the two hosts to sync disk storage and other associated tasks). Scroll through the list ticking the Compute adapter on each host for the Compute switch, and both Storage adapters on each host for the Storage switch. Then click Apply and test.
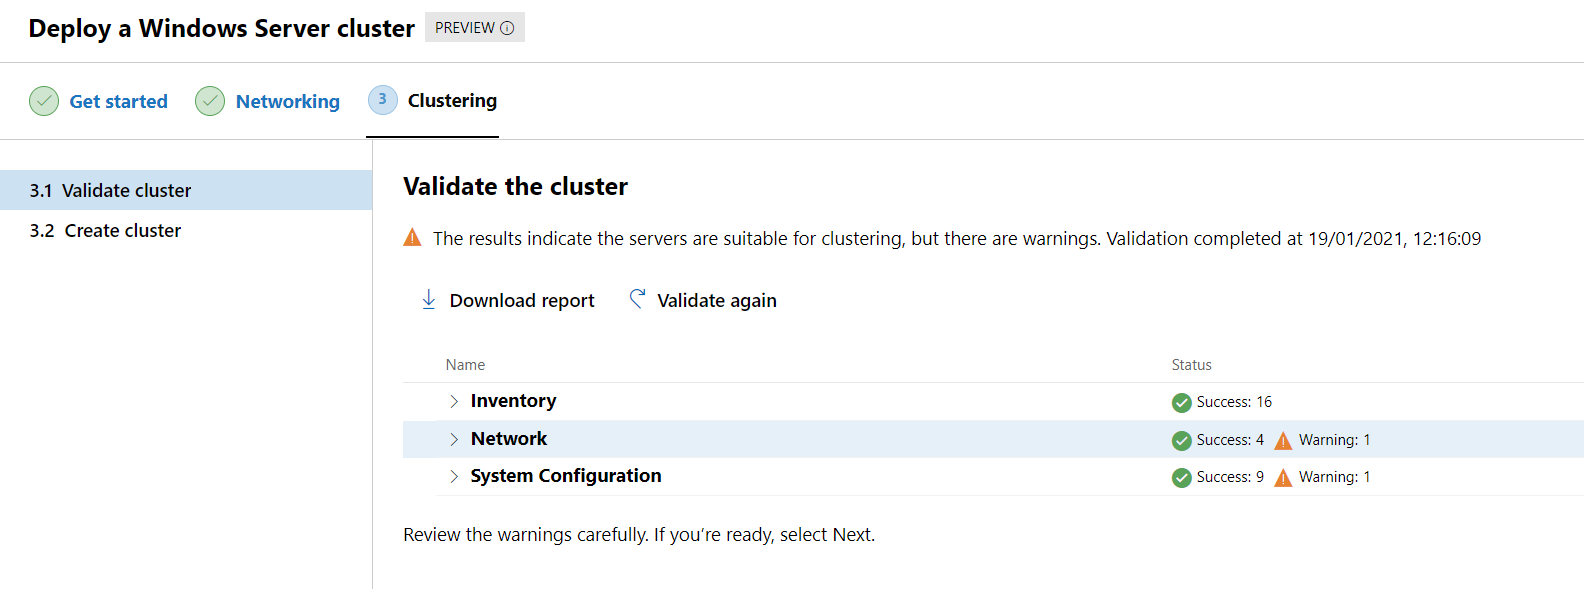
Slowly getting there - the last step is to validate and then create the cluster, so click on Validate. You'll probably be asked to enable CredSSP for this to work - so say Yes when prompted. This step takes several minutes to complete while it goes through a series of checks. Hopefully they will all show as Success, if there's any that haven't you can click Download report to find out why. When I did this I had a warning about IP configuration (no default gateway reachable - this is a lab setup so there isn't one) and a warning about system updates - it will tell you in the notifications area where it has saved the report. It's usually in %LocalAppData%\Temp on one of the host servers.
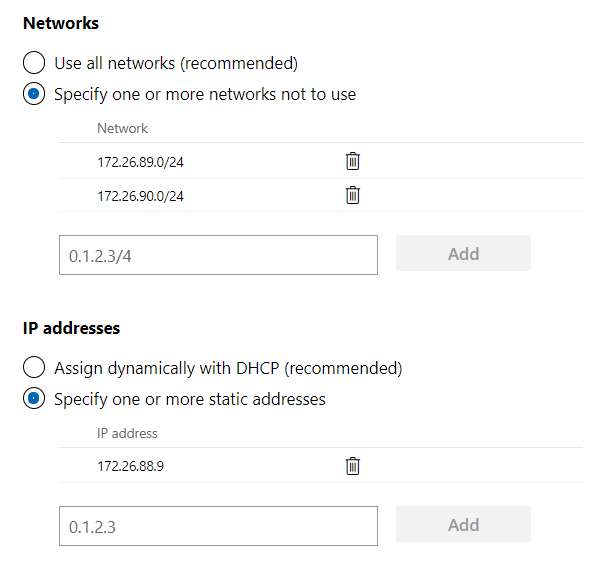
Finally we get to name the cluster, so enter the name into the box. It doesn't need to be a FQDN, just put a host name in. By default this will register the cluster in DNS and Active Directory, use all available networks and use DHCP to assign an IP address - click on Advanced to exclude both the Storage networks and assign a static IP address.
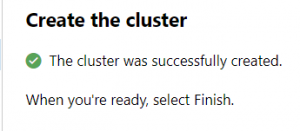
Now click on Create cluster. It will take a while setting the cluster up and with any luck you'll see this magnificent screen appear:
Setting up Storage Spaces Direct
So now we have a cluster but if you look in Disks you'll see it rather empty. Next step is to configure Storage Spaces Direct. On our management host you'll need to install the following using PowerShell:
Install-WindowsFeature -Name RSAT-Clustering-Powershell, Hyper-V-Powershell
Once that's done, you'll need to run the below script (taken out of the Microsoft docs), fill out the server list with your host names and run it on the management host in PowerShell.
$ServerList = "test-host1", "test-host2"

Invoke-Command ($ServerList) {
    Update-StorageProviderCache
    Get-StoragePool | ? IsPrimordial -eq $false | Set-StoragePool -IsReadOnly:$false -ErrorAction SilentlyContinue
    Get-StoragePool | ? IsPrimordial -eq $false | Get-VirtualDisk | Remove-VirtualDisk -Confirm:$false -ErrorAction SilentlyContinue
    Get-StoragePool | ? IsPrimordial -eq $false | Remove-StoragePool -Confirm:$false -ErrorAction SilentlyContinue
    Get-PhysicalDisk | Reset-PhysicalDisk -ErrorAction SilentlyContinue
    Get-Disk | ? Number -ne $null | ? IsBoot -ne $true | ? IsSystem -ne $true | ? PartitionStyle -ne RAW | % {
        $_ | Set-Disk -isoffline:$false
        $_ | Set-Disk -isreadonly:$false
        $_ | Clear-Disk -RemoveData -RemoveOEM -Confirm:$false
        $_ | Set-Disk -isreadonly:$true
        $_ | Set-Disk -isoffline:$true
    }
    Get-Disk | Where Number -Ne $Null | Where IsBoot -Ne $True | Where IsSystem -Ne $True | Where PartitionStyle -Eq RAW | Group -NoElement -Property FriendlyName
} | Sort -Property PsComputerName, Count
This script will list the number of disks available for S2D on each host, and it will clean them - make sure there's no data you want to keep on these disks as it will be lost. It won't alter the OS disk. You should see an output similar to below. If you've managed to fit some SSD in there to use as cache this will show here too.

While we've got PowerShell open, also run the following to set a registry key to allow us to use S2D on Windows Server 2019. It's been temporarily disabled while Microsoft wait for manufacturers to certify their hardware for use on Windows Server 2019, and asks you to contact support if you're not sure what you are doing on a production system. Since we want to use it, we'll bypass this. Finally we'll validate the cluster for S2D using Test-Cluster.
Invoke-Command ($ServerList) {
   New-ItemProperty -Path "HKLM:\SYSTEM\CurrentControlSet\Services\ClusSvc\Parameters" -Name "S2D" -Value 1 -PropertyType DWord
}
Test-Cluster -Node $ServerList -Include "Storage Spaces Direct"
This command is pretty quick at giving you the bad news. Usually it is to do with disk identifiers and disk enclosures.

You can have a look at the validation report in Windows Admin Centre by going to the cluster Overview page and clicking on Validation reports. In my case the warnings were about not having any SSD drives present (which is fine if you're not intending on being very disk intensive - my production system has no SSD cache and works fine, although it's not used for heavy file serving as all that is stored in OneDrive and Teams) - and a load of warnings about SCSI enclosures and lack of support for SCSI Enclosure Services (SES).
The next step is to run the following, again on the management host in PowerShell:
Enable-ClusterStorageSpacesDirect -CimSession This will take a minute or two to run through and should eventually complete. It may spit out a few warnings - in my case, another one about not having any SSD for cache. Not to worry.
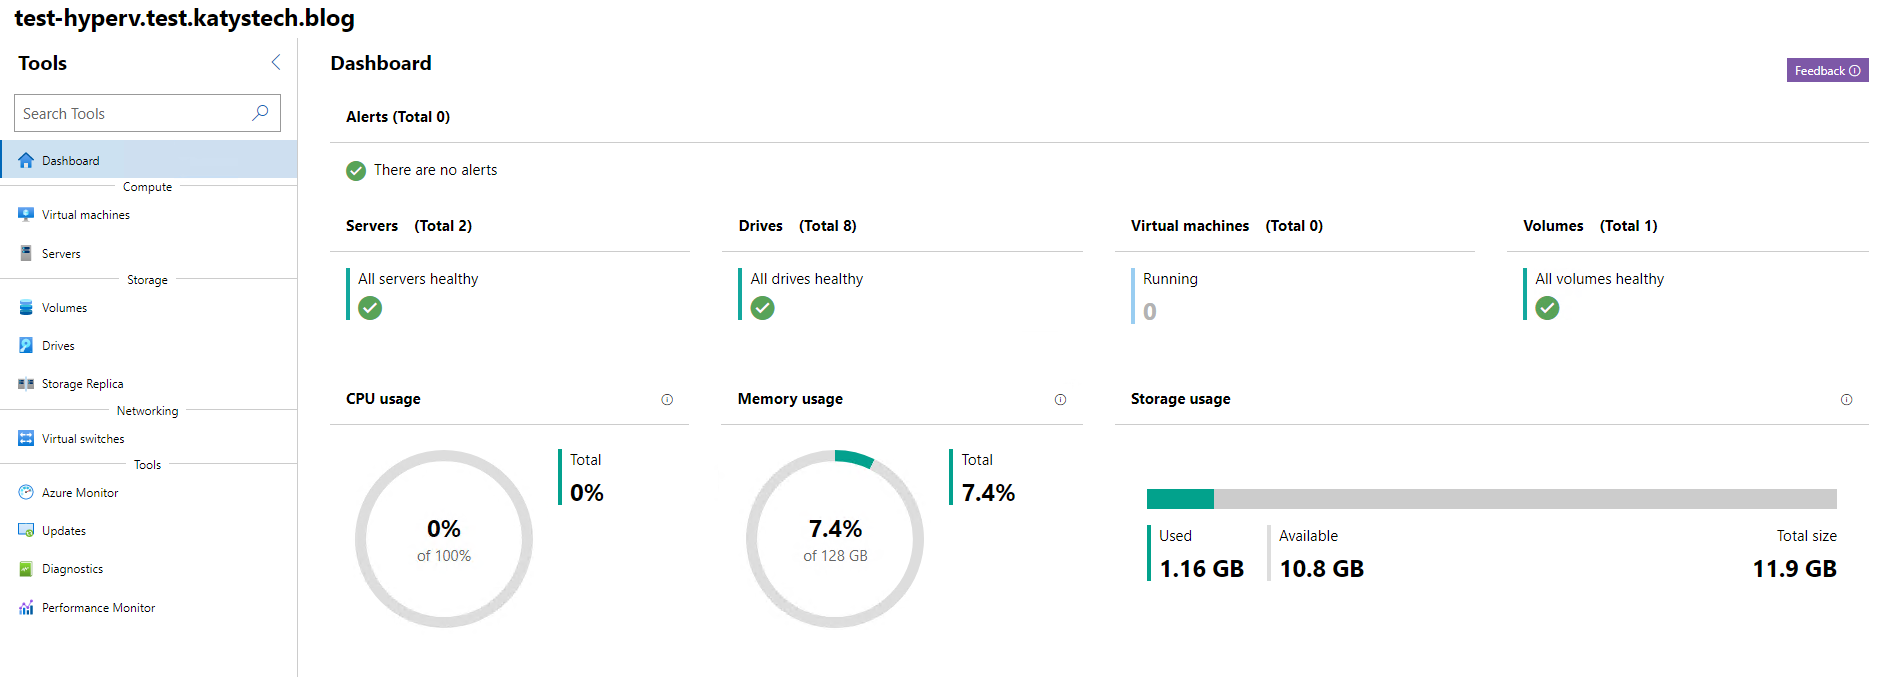
The next step is to re-load Windows Admin Centre so that it notices we've configured S2D - probably best to just close and re-load the browser. Once you're back in, click onto your cluster again and you should see a nice dashboard:
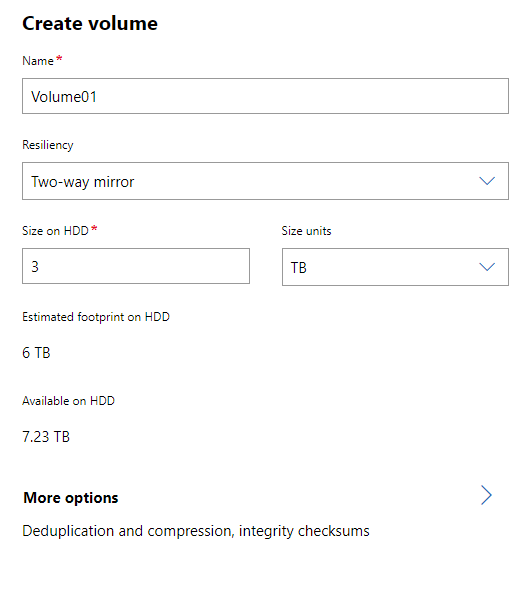
Click on Volumes on the left hand menu, then go to the Inventory tab. You should see a single volume already on there called ClusterPerformanceHistory. Click on Create to start making one to store our data. The level of resiliency available to us will depend on how many hosts we have in our cluster. As this is just a 2 node cluster all we can pick is a two-way mirror, which is fine. Don't be confused by the "Available on HDD" figure - this is the total available across all hosts, so I've had to create a 3TB volume to fit into the total 7.23TB available (3TB per host = 6TB out of 7.23TB total).
Give it a moment to create the volume and eventually it should show up in the Inventory list. Clicking on it will give you its detailed properties screen and show you the path on each host - in my case C:\ClusterStorage\Volume01 - along with some performance graphs.
Our next task here is to achieve a cluster quorum by configuring either a file share witness or a cloud witness. In the most basic terms I can think up, a cluster quorum helps where one node, or one site becomes isolated from the others for it to determine which has the issue - the side with the most votes wins, so when the issue is resolved the cluster will know which set was offline when syncing the disk changes back.
An explanation of this is available on the Microsoft Docs and rather than repeat it I'll link it here, as it's nice and detailed but it's a fairly easy thing to set up. It will mean you need to use either PowerShell or the Failover Clustering MMC snap-in. If you've got more than 2 nodes (or more than 2 sites if you have split across multiple sites) you probably don't need to worry about this and can go with the default witness setting.
You may remember back at the start we were asked to allow CredSSP and told we should disable it again afterwards. Unfortunately this is needed by Windows Admin Centre to do any cluster update tasks, so I've left it enabled.
Finally we can create a virtual machine on our cluster! First thing you'll want to do, assuming you are booting from a the ISO rather than an existing network boot server, is to copy the ISO onto the cluster storage volume. This will be shown on the hosts as a folder within C:\ClusterStorage, in my case C:\ClusterStorage\Volume01. In here I usually just add a folder called ISO.
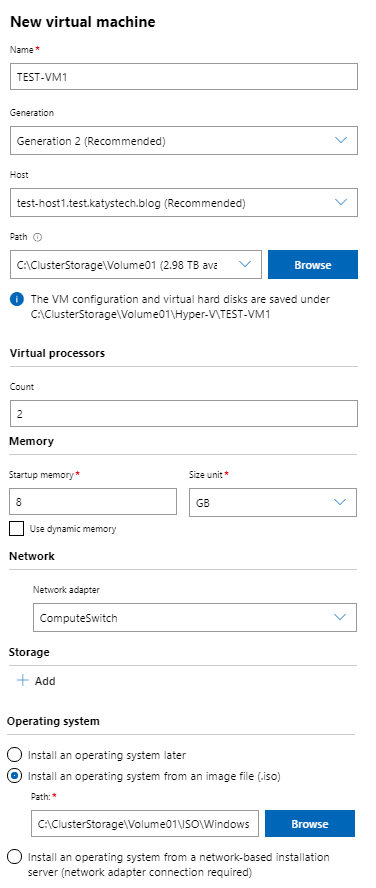
Now go to the Virtual Machines section on the left, and then click on Add then New. Fill out the desired configuration - make sure you select the correct path for the storage, i.e. C:\ClusterStorage\Volume01 - it's available from the drop down list so you don't need to browse for it. Add a network adapter on the Compute switch, create a disk and either mount the ISO we copied earlier, or select to boot from a network boot server, then click Create. If you're booting from a network server with a Generation 2 VM your boot server will need to support UEFI based network boot. With a Generation 1 VM you'd need a legacy network adapter installing onto the VM before it can boot.
Hopefully it will create the VM successfully for you - it does occasionally give error messages at the moment - in these cases I drop back to the Failover Cluster MMC snap-in to perform the action I was attempting - this tends to be when amending existing VMs rather than creating new ones. One issue I seem to always have trouble with is setting the VLAN on the network adapter - it claims it's not compatible with the bandwidth reservation mode - however it still applies the setting anyway. Hopefully this is something that will be fixed in a future update.
It will automatically select which it thinks is the best host for your virtual machine to run on - you can change this if you want to. With a clustered virtual machine, if one host suddenly fails, the virtual machine will start up on the other host giving minimal downtime. Assuming the disks have been keeping sync there shouldn't be any data loss - this is why the multiple 10GbE connections are important. If you need to shut down or pause a host for maintenance it will also drain all running virtual machines off that host - live migrating the running virtual machine to another host with zero downtime. (If you run a continual "ping" to the VM you are moving you'll maybe notice a single packet drop). You can also live migrate as and when desired either through Windows Admin Centre (when viewing a virtual machine, click on Manage then Move) or through the Failover Clustering Manager MMC snap-in. If you're used to VMWare, this is basically the equivalent to vMotion.
Once your VM has created you can click on it to view its properties and status, and you can start it and connect to its console. If you're asked to authenticate when connecting to the console, this will be credentials for the cluster/hosts, not credentials relating to the guest VM.
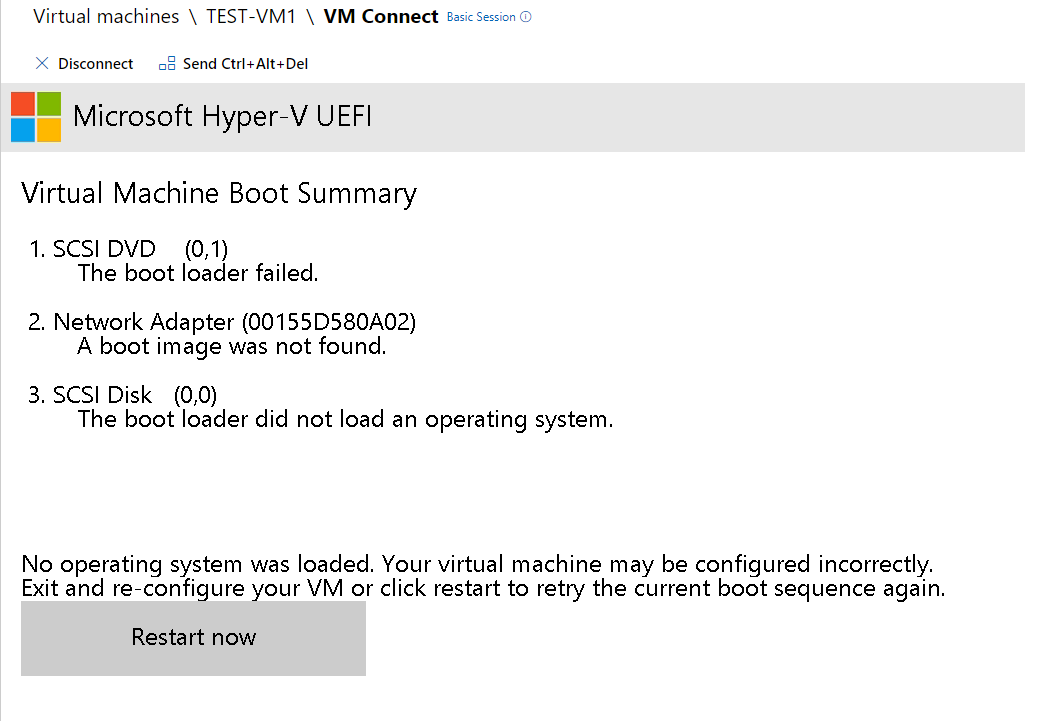
With the configuration I've used, once you start the VM you'll find a boot error message - because we can't start it, then connect, quick enough to see the "Press any key to boot from CD/DVD" message to launch Windows setup. Luckily there is a restart button that we can press to try again, failing that we can press Send Ctrl+Alt+Del to restart it.
I also briefly looked at some of the Hyper-V and clustering bits of Windows Admin Centre in a previous post which you might want to take a look at.
If a host suddenly loses power, the remaining host should stay running (worked out using the cluster quorum mentioned earlier) and anything that was running on the failed host will re-start on the remaining host (or if you've got more than 2 hosts, one of the remaining hosts). Once you've got the failed host back online just let it boot up and it will re-join the cluster. You'll then be told in Windows Admin Centre how far behind the volumes are and they will automatically resync for you.
If you've shut down a host server gracefully it should have migrated the running virtual machines to another node and made sure the storage was up to date before shutting down. Once you've finished working on that host and got it powered back up, you'll see a similar message about the volumes needing repair - as any data written whilst the host was offline will need to be synced across.
Creating a Virtual Machine
What happens if a host loses power?


Further Reading
In this post
- Introduction
- Preparing the host servers
- Creating the cluster
- Setting up Storage Spaces Direct
- Creating a Virtual Machine
- What happens if a host loses power?
- Further Reading
Support My Work
I hope you find my content useful. Please consider tipping to support the running costs of hosting, licensing etc on my Ko-fi page.


